With October release of the Python extension, we’re excited to announce the support of native editing of Jupyter notebooks inside Visual Studio Code! You can now directly edit .ipynb files and get the interactivity of Jupyter notebooks with all of the power of VS Code.
You can manage source control, open multiple files, and leverage productivity features like IntelliSense, Git integration, and multi-file management, offering a brand-new way for data scientists and developers to experiment and work with data efficiently. You can try out this experience today by downloading the latest version of the Python extension and creating/opening a Jupyter Notebook inside VS Code.

Since the initial release of our data science experience in VS Code, one of the top features that users have requested has been a more notebook-like layout to edit their Jupyter notebooks inside VS Code. In the rest of this post we’ll take a look at the new capabilities this offers.
This article in our blog.
Here’s how to get started with Jupyter in VS Code.

Once you have a Jupyter Notebook open, you can add new cells, write code in cells, run cells, and perform other notebook actions.
As you write code, IntelliSense will give you intelligent code complete suggestions right inside your code cells. You can further supercharge your editor experience by installing our IntelliCode extension to get AI-powered IntelliSense with smarter auto-complete suggestions based on your current code context.

Another benefit of using VS Code is that you can take advantage of the variable explorer and plot viewer by clicking the «Variables» button in the notebook toolbar. The variable explorer will help you keep track of the current state of your notebook variables at a glance, in real-time.
Now you can explore your datasets, filter your data, and even export plots! Gone are the days of having to type df.head() just to view your data.
When a Jupyter notebook file is created or opened, VS Code automatically creates a Jupyter server for you locally by default. If you want to use a remote Jupyter server, it’s as simple as using the «Specify Jupyter server URI» command via the VS Code command palette, and entering in the server URI.

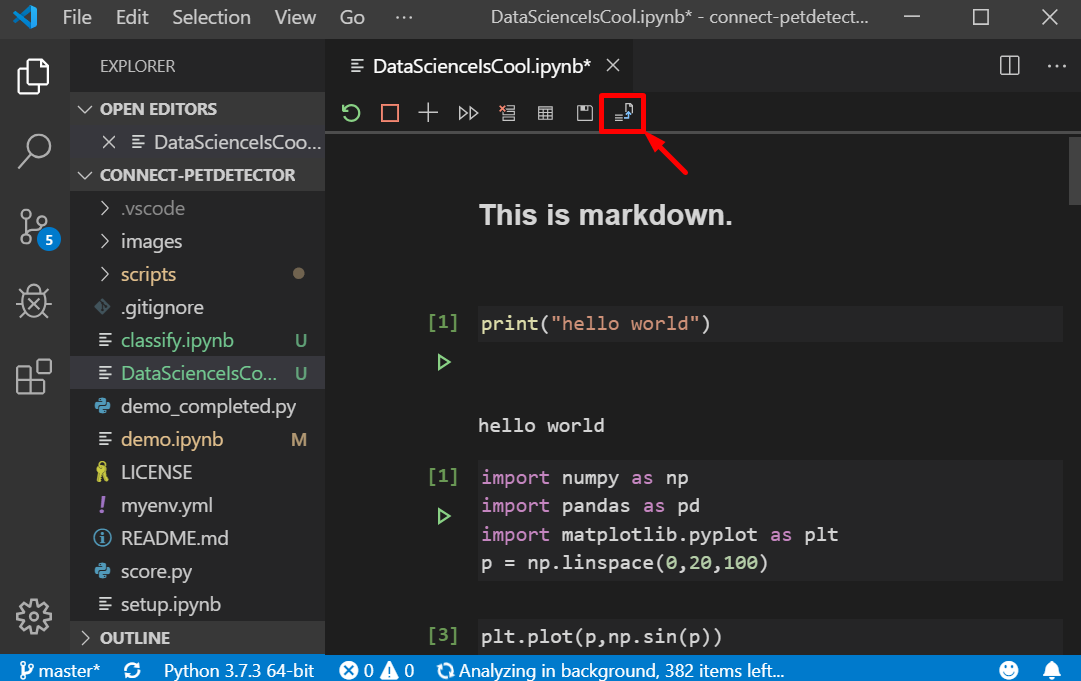
When you’re ready to turn experimentation into production-ready Python code, just simply press the «Convert and Save as Python File» button in the top toolbar and let the Python extension do all the work for you. You can then view that Python code in our existing Python Interactive window and keep on working with the awesome features of the Python extension to further make your code production-ready, such as the integrated debugger, refactoring, Visual Studio Live Share, and Git source control.
VS Code supports debugging Jupyter Notebooks through using the «Exporting as Python Code» functionality outlined in the previous section. Once you have your code in the Python Interactive window, you can use VS Code’s integrated debugger to debug your code. We are working on bringing cell debugging into the Jupyter editor in a future release so stay tuned!
You can manage source control, open multiple files, and leverage productivity features like IntelliSense, Git integration, and multi-file management, offering a brand-new way for data scientists and developers to experiment and work with data efficiently. You can try out this experience today by downloading the latest version of the Python extension and creating/opening a Jupyter Notebook inside VS Code.
Since the initial release of our data science experience in VS Code, one of the top features that users have requested has been a more notebook-like layout to edit their Jupyter notebooks inside VS Code. In the rest of this post we’ll take a look at the new capabilities this offers.
This article in our blog.
Getting Started
Here’s how to get started with Jupyter in VS Code.
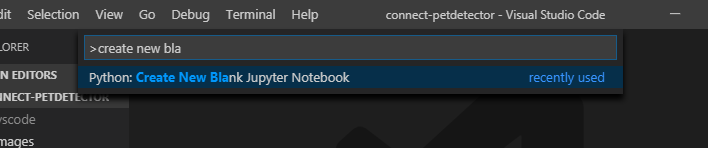
- If you don’t already have an existing Jupyter Notebook file, open the VS Code Command Palette with the shortcut CTRL + SHIFT + P (Windows) or Command + SHIFT + P (macOS), and run the «Python: Create Blank New Jupyter Notebook» command.
- If you already have a Jupyter Notebook file, it’s as simple as just opening that file in VS Code. It will automatically open with the new native Jupyter editor.
Once you have a Jupyter Notebook open, you can add new cells, write code in cells, run cells, and perform other notebook actions.
AI-Assisted Autocompletion
As you write code, IntelliSense will give you intelligent code complete suggestions right inside your code cells. You can further supercharge your editor experience by installing our IntelliCode extension to get AI-powered IntelliSense with smarter auto-complete suggestions based on your current code context.
Variable Explorer
Another benefit of using VS Code is that you can take advantage of the variable explorer and plot viewer by clicking the «Variables» button in the notebook toolbar. The variable explorer will help you keep track of the current state of your notebook variables at a glance, in real-time.

Now you can explore your datasets, filter your data, and even export plots! Gone are the days of having to type df.head() just to view your data.
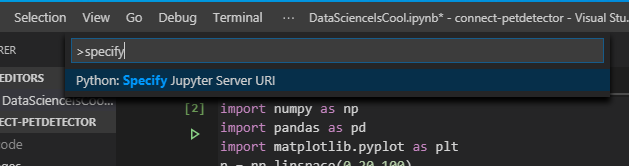
Connecting To Remote Jupyter Servers
When a Jupyter notebook file is created or opened, VS Code automatically creates a Jupyter server for you locally by default. If you want to use a remote Jupyter server, it’s as simple as using the «Specify Jupyter server URI» command via the VS Code command palette, and entering in the server URI.
Exporting as Python Code
When you’re ready to turn experimentation into production-ready Python code, just simply press the «Convert and Save as Python File» button in the top toolbar and let the Python extension do all the work for you. You can then view that Python code in our existing Python Interactive window and keep on working with the awesome features of the Python extension to further make your code production-ready, such as the integrated debugger, refactoring, Visual Studio Live Share, and Git source control.

Debugging
VS Code supports debugging Jupyter Notebooks through using the «Exporting as Python Code» functionality outlined in the previous section. Once you have your code in the Python Interactive window, you can use VS Code’s integrated debugger to debug your code. We are working on bringing cell debugging into the Jupyter editor in a future release so stay tuned!
