Hyperledger Fabric is an open-source blockchain platform from the Linux Foundation. With its help, you can create blockchain applications and control access and permissions for data in the blockchain. The most popular reason to use Hyperledger Fabric is to create a private blockchain network or set restrictions on what transactions each side can see.
The documentation of Hyperledger Fabric describes the creation of a blockchain network on one machine using Docker, where each member of the network is a separate container. But the process of setting up a network on several physical or virtual machines is not well described. Therefore, we decided to discuss this in the article.
Our blockchain application is a service for storing the medical data of school and preschool children. The data must remain unchanged. It will be presented in the form of information on vaccination and on the patient's agreement with a particular doctor. The members of the network include Parents (an organization that represents the interests of parents), Hospital (a hospital which represents pediatricians with whom parents can enter into an agreement to care for their children) and Kindergarten (a kindergarten that can request health and vaccinations reports of a child from the hospital).
AWS has an Amazon Managed Blockchain service. It allows deploying blockchain networks using the AWS console user interfaces. But, having gained some experience with Amazon Managed Blockchain, we had to abandon the idea of using the service in commercial projects. There were several reasons for this. The main ones include:
Therefore, in our opinion, it is better to use virtual or physical servers to build networks using the Hyperledger Fabric framework.
Hyperledger Fabric operates with the concept of «channel.» A channel is a subnet for conducting sensitive transactions. Our application has two channels:
We deploy our blockchain network using Docker Swarm — this is the native Docker system for deploying a host cluster. If you've never worked with Docker, first check out this product and how to orchestrate containers using Docker Swarm. The documentation precisely describes the basics of working with these tools.
Our entire network is located on AWS EC2 servers. Information within the blockchain network is stored in CouchDB. Hyperledger Fabric also supports the LevelDB database. CouchDB allows you to search in a collection of documents by any criteria. LevelDB, in turn, does not have this feature. We also use Fabric Certificate Authority — this is a modular component for managing network identifiers of all organizations and their users. It provides registration of network participants and the issuance of certificates.
We have four EC2 servers:
To begin with, we need t2.medium services for this work. This type of EC2 server has sufficient computing power to install all the necessary software and work with the Hyperledger Fabric tool. In the Configure Security Group, we set All traffic, and Source — 0.0.0.0/0, :: / 0.

Fig. 1. Setting Security Group in the AWS panel.
As a result, we got 4 EC2 servers:
Of course, you will have your own paths to EC2 servers.

Fig. 2. EC2 servers prepared for work.
Now we need to install Docker and Git on each EC2 server. For convenience, open four tabs in the terminal. Let's go to each EC2 service via SSH:
Тerminal 1:
Тerminal 2:
Тerminal 3:
Тerminal 4:
In each terminal, execute the following commands:
Now we have Docker and Git installed.
We need to clone elements of our network from the repository. To do so, execute the following command in each terminal:
We also need to clone smart contracts from the repository that will regulate the relationships between network participants. Smart contracts are written in Go.
Then perform these steps on each of the four servers:
In the first terminal, we need to generate channel configuration files and certificates for connecting organizations to the network:
Now copy the channel-artifacts and crypto-config folders to the other three hosts in the poc-network folder of the network's parent directory. Please note: when copying organizations to the EC2 server, you need to remove third-party certificates from the crypto-config / peerOrganizations folder that relate to the work of other organizations. For example, when copying to the Parents host, we need to leave the parents.poc-network.com folder in this folder but delete hospital.poc-network.com and kindergarten.poc-network.com.
In order for containers that belong to different organizations and are located on different EC2 servers to access each other, we need to combine them into a stack. Let's look at our file network / poc-network / docker-compose-general.yaml. It contains the configuration of services, indicates which hosts a particular service will deploy (key node.hostname), and defines aliases (key aliases).
We need to initialize the swarm in the first terminal:
There will appear a token for attachment of another EC2 server to the stack. It is something like:
Now we can execute the same in the remaining terminals:
The console should demonstrate a message:
After all three hosts are connected to Swarm, we can see them in the terminal of the first host by running the command:

Fig. 3. List of servers in Docker Swarm.
In the network / poc-network folder there is a .env.template file, in which you need to register hostname for each of the hosts:
To generate an .env file, run the ./3_env_gen.sh file.
Now create a network with the overlay driver:
Run Swarm to create a stack based on the docker-compose-general.yaml file:
With this command, we also set environment variables, which are described in the .env file and are necessary for the network to work correctly.
You can run the

Fig. 4. List of services that were running on all EC2 servers.
If your terminal shows the same as this screenshot, everything is fine. Now run the network. In the second terminal, enter the CLI container (after all, this container is deployed on the second host):
The container name can be seen by executing the docker
In the container, we execute all our commands from the 4_create_channels.sh file, copying them one by one to the terminal. In the bin folder, we have the binaries for creating the network:
Now you can leave the container by running the
Install the application on the second host:
You also need to install nodejs and gcc-c ++ (compiler):
You can also enter our database through
It is also necessary to connect our API application to the database:
Assign the correct value to the ‘host’ key.
Our back-application has prepared migrations and seeds. You need to run them:
Tables should appear in the database. In the table of organizations we will see three rows with our organizations — Parents, Hospital, Kindergarten.
Generating certificates, we created files for each organization on the first host to connect to the network. Copy the connection-parents.json file from the first host to the second. To do so, open another terminal from the folder where our key is and run the commands:
Edit exports.hostName in constants.js (value for the current host):
Launch the app in the second terminal:
Set the correct value in the userGenerator.sh file to the HOST_2 variable:
Next, we need to run a script that will create users of the Parents organization
Run the script to generate medical records:
Two cards will be created in the blockchain, which will also be written to the sql database in the cards table.
Via analogy with the previous back-application, we need to place a file to connect to the network on the third host. To do this, in the fifth terminal, execute the following:
Install the app on the third post:
You also need to install nodejs and gcc-c ++ (compiler):
Edit exports.hostName in constants.js (value for the current host):
Launch the app in the third terminal:
Set the correct value in the userGenerator.sh file to the HOST_3 variable:
Next, we need to run a script that will create users of the Hospital organization
We now have a second user in the Users table in the database.
By analogy with the previous back-application, we need to place a file to connect to the network on the third host. To do this, in the fifth terminal, execute the following:
Install the app on the third host:
You also need to install nodejs and gcc-c ++ (compiler):
Edit exports.hostName in constants.js (value for the current host):
Launch the app in the third terminal:
Set the correct value in the userGenerator.sh file to the HOST_4 variable:
Next, we need to run a script that will create users of the Kindergarten organization
We now have a third user in the Users table in the database.
An important point. The back-application uses the wkhtmltopdf library to generate a PDF report on the child’s health status.
We need to install libpng — the official library for working with raster graphics in PNG format. The library is platform-independent and consists of functions written in C language. So let's get started.
The first command to install wkhtmltox is the open source LGPLv3 library for rendering HTML to PDF and various image formats using the QtWebKit rendering engine:
The second block of commands will download and deploy the libpng15 library:
The third block of commands is needed to install the compiler:
You also need to install LibTIFF:
Now we can test:
Now you can generate PDF files.
Node js tools for working with the Hyperledger Fabric network are presented in the form of «fabric-ca-client -v 1.4.0» and «fabric-network» v 1.4.0 «packages. All back-end services, which interact with the network through the Node SDK, located in the Services folder, at the root of the project.
You can read more about these tools and their methods in the official documentation.
It’s worth talking now about how network members interact with each other in this application. All processes are described in a UML diagram. Let us dwell on each of them in more detail.
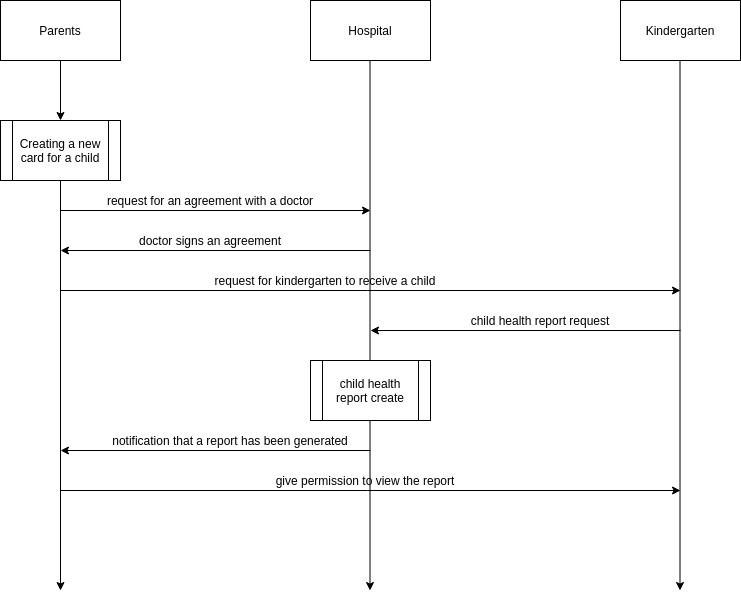
Fig. 5. Graphical description of business processes in the application
As we have already indicated there are several organizations present in the network: Parents, Hospital and Kindergarten.
A member of the ‘Parents’ organization creates electronic health records for two of his children. This data will be stored (and supplemented) in the blockchain network. Next, the parent sends a request for an agreement with the pediatrician, who will observe his children until they reach adulthood (in the diagram — request for an agreement with a doctor).
A member of the Hospital organization signs this agreement (in the diagram — doctor signs an agreement).
Next, the parent sends a request to kindergarten with a request to enroll his child (in the diagram — request for kindergarten to receive a child).

Fig. 6. Page with a list of available educational institutions in the parent's personal account
Kindergarten sees the request in the list of new requests:

Fig. 7. Page with a list of applications for admission in the personal account of the educational institution
In turn, Kindergarten before deciding whether to enroll a child must ensure that he is in a satisfactory state of health. To do so, the kindergarten sends a request to the clinic in which this child is observed (in the diagram — child health report request). The request to the pediatrician is executed automatically after the request for admission to the garden is moved to the «Accepted» tab.

Fig. 8. A page with a list of approved applications for admission to the personal account of the educational institution
The pediatrician sees the request and generates a report that stores data on the child’s health (in the diagram — child health report created).

Fig. 9. A page with a list of applications for creating a report on the state of the child’s health in the personal account of the hospital
A parent sees a pediatrician’s report.
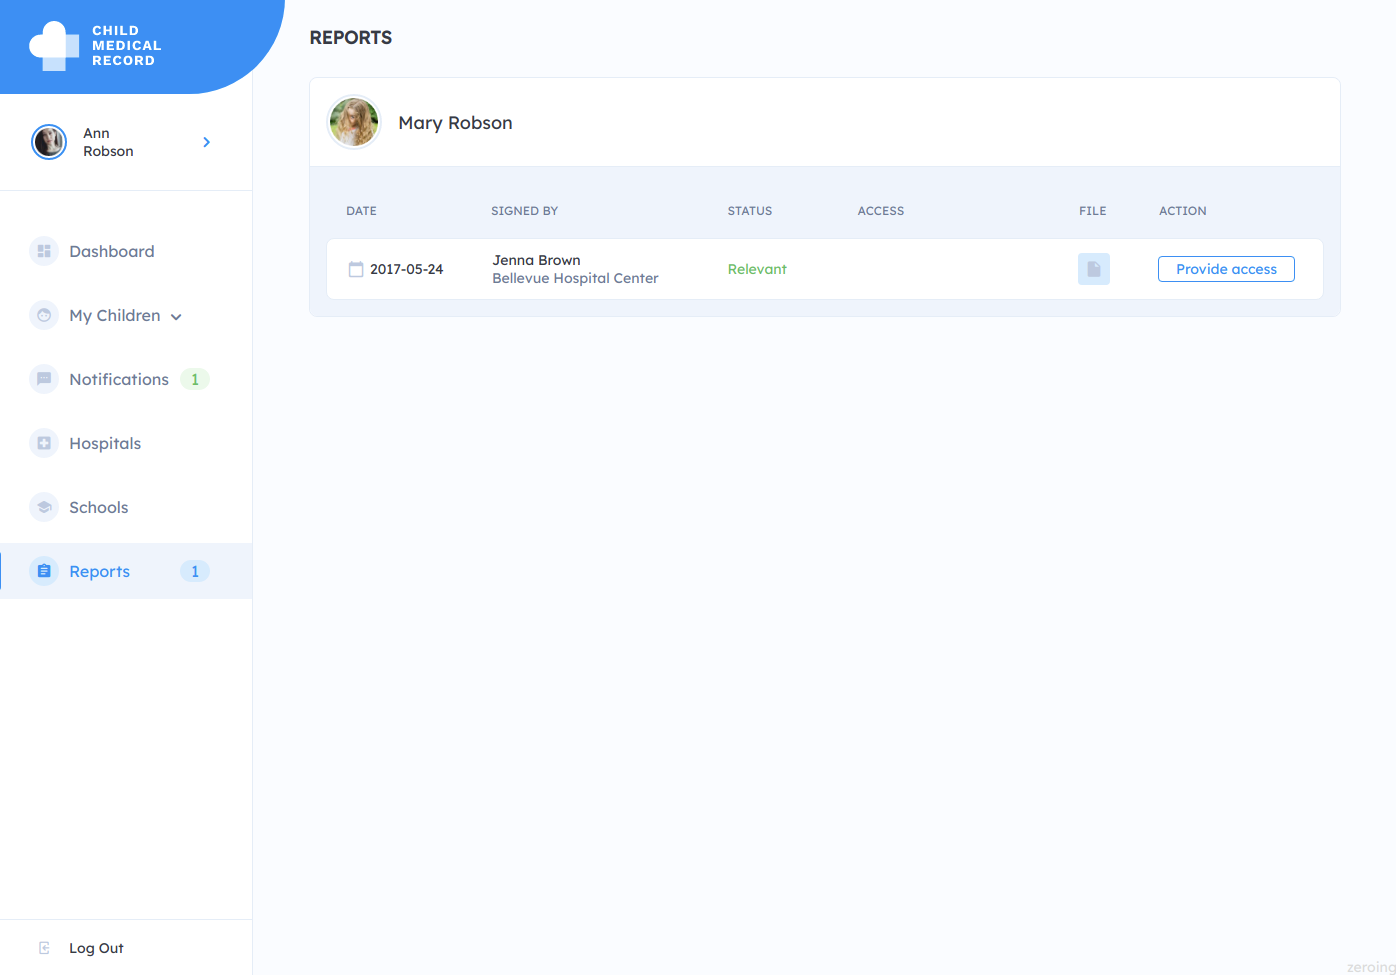
Fig. 10. A page in the parent’s personal account, which displays the status of reports on the child’s health
and makes a decision to provide access to the preschool educational institution to view and download the report (in the diagram — give permission to view the report).

Fig. 11. A pop-up window for choosing an educational institution that can view the generated medical report
and confirms sending the report.

Fig. 12. Notification that the selected educational institution has received permission to view a medical report
Information that the report has been generated and is available for viewing and downloading in PDF format appears in the list of reports in the application of the educational institution.

Fig. 13. Link to download the report in PDF format
Here is a report you will see in a new tab of your computer.

Fig. 14. A report on the state of the child’s health formed by the hospital employee
Since this application is designed specifically to demonstrate the deployment of the network on separate EC2 servers, we will execute some commands from prepared scripts.
First EC2 Server:
We previously connected to the database. After executing this command, you will see two entries in the Cards table. Also, information about the medical data of these two children was recorded on the blockchain.
Also from this EC2 server we need to create an agreement with a pediatrician who will observe these children. Let's do that:
Now this agreement must be signed by the user which we created for the organization Hospital. We execute the command from the second host:
The agreement is signed by the doctor and we can continue to work on our application. Next, we need to install the frontend application on 2, 3 and 4 EC2 servers.
P.S .: You can find all the commands for generating users, cards, agreements and signing agreements in the ~ / back / generators folder.
Run the following command on the second host (where the Parents organization is located):
Then correct the host name on which the front-end application will be located:
You also need to install the dependencies:
It is also necessary to build the application and run it on the port 8080:
The application will be available at: http: // <HOST_2>: 8080, where <HOST_2> is the address of the second EC2 server on which this application is located.
Login: parents. Login Password: password
This is what the front-end will look like. Here you will see information about the medical cards that we created from the terminal.

Fig. 15. Information on the children’s medical records in the personal account of the parent
Run the following command on the second host (where the Hospital organization is located):
Then correct the host name on which the front-end application will be located:
You also need to install the dependencies:
It is also necessary to build the application and run it on port 8080:
The application will be available at: http: // <HOST_3>: 8080, where <HOST_3> is the address of the second EC2 server on which this application is located.
Login: hospital. Login Password: password
This is what the front-end will look like. Here you will see information about the medical cards that we created from the terminal.
Run the following command on the second host (where the Kindergarten organization is located):
Then correct the host name on which the front-end application will be located:
You also need to install the dependencies:
It is also necessary to build the application and run it on port 8080:
The application will be available at: http: // <HOST_4>: 8080, where <HOST_4> is the address of the second EC2 server on which this application is located.
Login: kindergarten. Login Password: password
This article shows how to deploy a blockchain application network on multiple virtual or physical servers. You will like the article if you are familiar with the basics of blockchain technology, know what smart contracts are, and at least a bit familiar with the Hyperledger Fabric framework and its standard fabric-samples application.
The documentation of Hyperledger Fabric describes the creation of a blockchain network on one machine using Docker, where each member of the network is a separate container. But the process of setting up a network on several physical or virtual machines is not well described. Therefore, we decided to discuss this in the article.
Our blockchain application is a service for storing the medical data of school and preschool children. The data must remain unchanged. It will be presented in the form of information on vaccination and on the patient's agreement with a particular doctor. The members of the network include Parents (an organization that represents the interests of parents), Hospital (a hospital which represents pediatricians with whom parents can enter into an agreement to care for their children) and Kindergarten (a kindergarten that can request health and vaccinations reports of a child from the hospital).
Amazon Managed Blockchain
AWS has an Amazon Managed Blockchain service. It allows deploying blockchain networks using the AWS console user interfaces. But, having gained some experience with Amazon Managed Blockchain, we had to abandon the idea of using the service in commercial projects. There were several reasons for this. The main ones include:
- The only available version of Hyperledger Fabric in the Amazon Managed Blockchain was Hyperledger Fabric 1.2, and when this article is released, the version 1.4 is available to build enterprise blockchain networks. However, this version does not allow the use of modern versions of the Node.js SDK tools too.
- Amazon Managed Blockchain does not support the CouchDB database, making it difficult to create applications in which the stored data is being indexed.
Therefore, in our opinion, it is better to use virtual or physical servers to build networks using the Hyperledger Fabric framework.
On the App Channels
Hyperledger Fabric operates with the concept of «channel.» A channel is a subnet for conducting sensitive transactions. Our application has two channels:
- «Parentshospital» designed for transactions between members of the Parents and Hospital organizations: creating and changing medical records, making an agreement with a pediatrician, and signing it.
- «Parentshospitalkindergarten» In this channel, members of Parents and Hospital groups interact with members of Kindergarten. Also, reports based on data from medical records are generated.
Working environment
We deploy our blockchain network using Docker Swarm — this is the native Docker system for deploying a host cluster. If you've never worked with Docker, first check out this product and how to orchestrate containers using Docker Swarm. The documentation precisely describes the basics of working with these tools.
Our entire network is located on AWS EC2 servers. Information within the blockchain network is stored in CouchDB. Hyperledger Fabric also supports the LevelDB database. CouchDB allows you to search in a collection of documents by any criteria. LevelDB, in turn, does not have this feature. We also use Fabric Certificate Authority — this is a modular component for managing network identifiers of all organizations and their users. It provides registration of network participants and the issuance of certificates.
We have four EC2 servers:
- Orderer, MySQL DB (for storing information)
- Parents organization (Peer0, Peer1), CouchDB, Fabric-CA, CLI
- Hospital organization (Peer0, Peer1), CouchDB, Fabric-CA
- Kindergarten organization (Peer0, Peer1), CouchDB, Fabric-CA
Creating EC2 Servers on AWS
To begin with, we need t2.medium services for this work. This type of EC2 server has sufficient computing power to install all the necessary software and work with the Hyperledger Fabric tool. In the Configure Security Group, we set All traffic, and Source — 0.0.0.0/0, :: / 0.

Fig. 1. Setting Security Group in the AWS panel.
As a result, we got 4 EC2 servers:
- ec2-18-232-164-119.compute-1.amazonaws.com
- ec2-54-145-203-186.compute-1.amazonaws.com
- ec2-54-80-241-117.compute-1.amazonaws.com
- ec2-52-87-193-235.compute-1.amazonaws.com
Of course, you will have your own paths to EC2 servers.

Fig. 2. EC2 servers prepared for work.
Installing software on EC2 servers
Now we need to install Docker and Git on each EC2 server. For convenience, open four tabs in the terminal. Let's go to each EC2 service via SSH:
Тerminal 1:
HOST1=ec2-18-232-164-119.compute-1.amazonaws.com
ssh ec2-user@$HOST1 -i ./key-poc.pem
Тerminal 2:
HOST2=ec2-54-145-203-186.compute-1.amazonaws.com
ssh ec2-user@$HOST2 -i ./key-poc.pem
Тerminal 3:
HOST3=ec2-54-80-241-117.compute-1.amazonaws.com
ssh ec2-user@$HOST3 -i ./key-poc.pem
Тerminal 4:
HOST4=ec2-52-87-193-235.compute-1.amazonaws.com
ssh ec2-user@$HOST4 -i ./key-poc.pem
In each terminal, execute the following commands:
sudo yum update -y
sudo yum install -y docker
sudo service docker start
sudo docker info
sudo yum install git
sudo usermod -a -G docker ec2-user
newgrp docker
Now we have Docker and Git installed.
Network
We need to clone elements of our network from the repository. To do so, execute the following command in each terminal:
git clone https://gitlab.nixdev.co/poc-blockchain/network.gitWe also need to clone smart contracts from the repository that will regulate the relationships between network participants. Smart contracts are written in Go.
Then perform these steps on each of the four servers:
cd network && mkdir chaincode && cd chaincode
git clone https://gitlab.nixdev.co/poc-blockchain/medical-contract.git
git clone https://gitlab.nixdev.co/poc-blockchain/kindergarten-contract.git
In the first terminal, we need to generate channel configuration files and certificates for connecting organizations to the network:
cd network/poc-network
./1_generate_connection_files.sh
./2_generating_channel_configuration.sh
Now copy the channel-artifacts and crypto-config folders to the other three hosts in the poc-network folder of the network's parent directory. Please note: when copying organizations to the EC2 server, you need to remove third-party certificates from the crypto-config / peerOrganizations folder that relate to the work of other organizations. For example, when copying to the Parents host, we need to leave the parents.poc-network.com folder in this folder but delete hospital.poc-network.com and kindergarten.poc-network.com.
Creating a Docker Swarm Stack
In order for containers that belong to different organizations and are located on different EC2 servers to access each other, we need to combine them into a stack. Let's look at our file network / poc-network / docker-compose-general.yaml. It contains the configuration of services, indicates which hosts a particular service will deploy (key node.hostname), and defines aliases (key aliases).
We need to initialize the swarm in the first terminal:
docker swarm init
docker swarm join-token manager
There will appear a token for attachment of another EC2 server to the stack. It is something like:
docker swarm join --token SWMTKN-1-42ml0ohnnbidg8kflgp8xp9dkkus6mn1lslqc15hrxj4tk9e3q-5h4vbzbfk8p90n83oe08gbltf 172.31.46.214:2377.Now we can execute the same in the remaining terminals:
docker swarm join --token SWMTKN-1-2xzco7t7txohnzd09318eczpbgmm8woex80byxptpt1jl5i2ar-bsg37h40xze1gaabg80i96gw2 172.31.38.245:2377
The console should demonstrate a message:
This node joined a swarm as a manager.
After all three hosts are connected to Swarm, we can see them in the terminal of the first host by running the command:
docker node ls

Fig. 3. List of servers in Docker Swarm.
In the network / poc-network folder there is a .env.template file, in which you need to register hostname for each of the hosts:
ORDERER=ip-172-31-38-245
PARENTS=ip-172-31-43-64
HOSPITAL=ip-172-31-38-130
KINDERGARTEN=ip-172-31-40-157
To generate an .env file, run the ./3_env_gen.sh file.
Now create a network with the overlay driver:
docker network create --driver overlay --attachable stage_byfn
Run Swarm to create a stack based on the docker-compose-general.yaml file:
env $(cat .env | grep ^[A-Z] | xargs) docker stack deploy -c docker-compose-general.yaml stage 2>&1
With this command, we also set environment variables, which are described in the .env file and are necessary for the network to work correctly.
You can run the
docker service ls command in the first terminal. You will see a list of all the services that are running on all our EC2.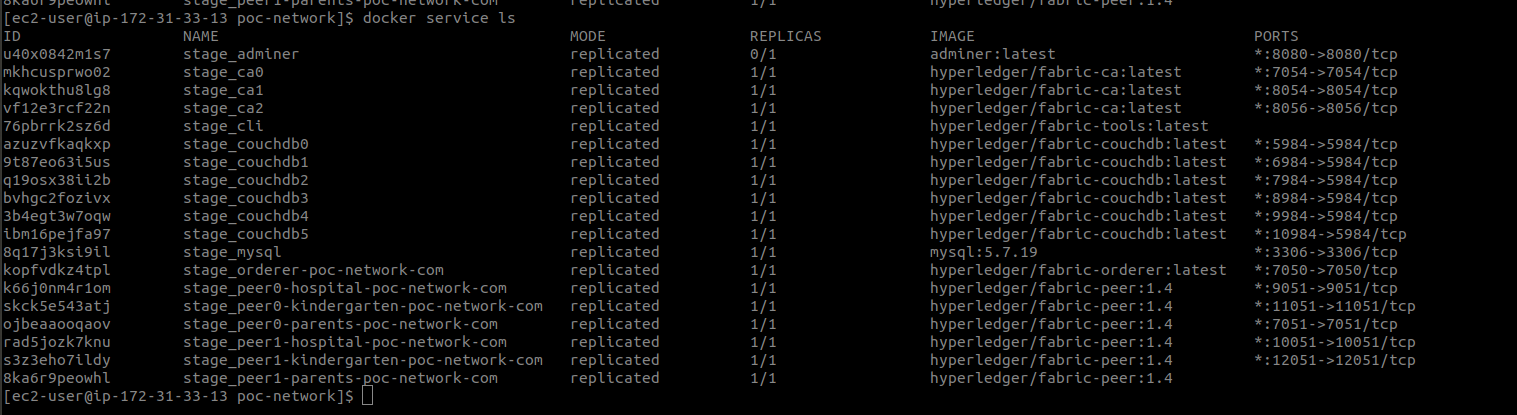
Fig. 4. List of services that were running on all EC2 servers.
If your terminal shows the same as this screenshot, everything is fine. Now run the network. In the second terminal, enter the CLI container (after all, this container is deployed on the second host):
docker exec -ti stage_cli.1.owni217t53m53efjtikb5oa2f /bin/bash
The container name can be seen by executing the docker
ps command in the terminal.In the container, we execute all our commands from the 4_create_channels.sh file, copying them one by one to the terminal. In the bin folder, we have the binaries for creating the network:
- peer channel create — create channels;
- peer channel join — joining a peer to a channel;
- peer channel update — update configurations;
- peer chaincode install — install the codecode;
- peer chaincode instantiate — deploy the specified chain code to the network.
Now you can leave the container by running the
exit command.Back Application for Organization «Parents»
Install the application on the second host:
cd ~
git clone https://github.com/nixsolutions/blockchain-poc-backend.git
You also need to install nodejs and gcc-c ++ (compiler):
curl -sL https://rpm.nodesource.com/setup_10.x | sudo bash -
sudo yum install nodejs
cd back
sudo yum install gcc-c++ -y
npm install
You can also enter our database through
adminer with the following authorization data:<HOST_1>:3306 (where <HOST_1> - this is the first EC2 server, where the data base is stored)
dev
devpass
poc_databaseIt is also necessary to connect our API application to the database:
vim ~/back/config/config.json
Assign the correct value to the ‘host’ key.
Our back-application has prepared migrations and seeds. You need to run them:
npx sequelize-cli db:migrate
npx sequelize-cli db:seed:all
Tables should appear in the database. In the table of organizations we will see three rows with our organizations — Parents, Hospital, Kindergarten.
Generating certificates, we created files for each organization on the first host to connect to the network. Copy the connection-parents.json file from the first host to the second. To do so, open another terminal from the folder where our key is and run the commands:
HOST1=ec2-18-232-164-119.compute-1.amazonaws.com
HOST2=ec2-54-145-203-186.compute-1.amazonaws.com
scp -i ./key-poc.pem -r ec2-user@$HOST1:~/network/poc-network/connection-parents.json ~
scp -i ./key-poc.pem ~/connection-parents.json ec2-user@$HOST2:~/network/poc-network
Edit exports.hostName in constants.js (value for the current host):
vim ~/back/constants.jsLaunch the app in the second terminal:
npm startSet the correct value in the userGenerator.sh file to the HOST_2 variable:
vim ~/back/generators/userGenerator.shNext, we need to run a script that will create users of the Parents organization
./back/generators/userGenerator.sh parents
Run the script to generate medical records:
node ~/back/generators/setCards.js
Two cards will be created in the blockchain, which will also be written to the sql database in the cards table.
Back Application for Organization «Hospital»
Via analogy with the previous back-application, we need to place a file to connect to the network on the third host. To do this, in the fifth terminal, execute the following:
scp -i ./key-poc.pem -r ec2-user@$HOST1:~/network/poc-network/connection-hospital.json ~
scp -i ./key-poc.pem ~/connection-hospital.json ec2-user@$HOST3:~/network/poc-network
Install the app on the third post:
cd ~
git clone https://github.com/nixsolutions/blockchain-poc-backend.git
You also need to install nodejs and gcc-c ++ (compiler):
curl -sL https://rpm.nodesource.com/setup_10.x | sudo bash -
sudo yum install nodejs
cd back
sudo yum install gcc-c++ -y
npm install
Edit exports.hostName in constants.js (value for the current host):
vim ~/back/constants.jsLaunch the app in the third terminal:
npm start
Set the correct value in the userGenerator.sh file to the HOST_3 variable:
vim ~/back/generators/userGenerator.s
Next, we need to run a script that will create users of the Hospital organization
./back/generators/userGenerator.sh hospital
We now have a second user in the Users table in the database.
Back Application for Organization «Kindergarten»
By analogy with the previous back-application, we need to place a file to connect to the network on the third host. To do this, in the fifth terminal, execute the following:
scp -i ./key-poc.pem -r ec2-user@$HOST1:~/network/poc-network/connection-kindergarten.json ~
scp -i ./key-poc.pem ~/connection-kindergarten.json ec2-user@$HOST4:~/network/poc-network
Install the app on the third host:
cd ~
git clone https://github.com/nixsolutions/blockchain-poc-backend.git
You also need to install nodejs and gcc-c ++ (compiler):
curl -sL https://rpm.nodesource.com/setup_10.x | sudo bash -
sudo yum install nodejs
cd back
sudo yum install gcc-c++ -y
npm install
Edit exports.hostName in constants.js (value for the current host):
vim ~/back/constants.js
Launch the app in the third terminal:
npm start
Set the correct value in the userGenerator.sh file to the HOST_4 variable:
vim ~/back/generators/userGenerator.sh
Next, we need to run a script that will create users of the Kindergarten organization
./back/generators/userGenerator.sh kindergarten
We now have a third user in the Users table in the database.
Installation of wkhtmltopdf on 2, 3, and 4 EC2 servers
An important point. The back-application uses the wkhtmltopdf library to generate a PDF report on the child’s health status.
We need to install libpng — the official library for working with raster graphics in PNG format. The library is platform-independent and consists of functions written in C language. So let's get started.
The first command to install wkhtmltox is the open source LGPLv3 library for rendering HTML to PDF and various image formats using the QtWebKit rendering engine:
wget https://downloads.wkhtmltopdf.org/0.12/0.12.5/wkhtmltox-0.12.5-1.centos7.x86_64.rpm
sudo yum install -y wkhtmltox-0.12.5-1.centos7.x86_64.rpm
The second block of commands will download and deploy the libpng15 library:
wget https://sourceforge.net/projects/libpng/files/libpng15/older-releases/1.5.15/libpng-1.5.15.tar.gz/download -O libpng-1.5.15.tar.gz
tar -zxvf libpng-1.5.15.tar.gz
cd libpng-1.5.15
The third block of commands is needed to install the compiler:
sudo yum groupinstall -y "Development Tools"
./configure --prefix=/usr
sudo make install
You also need to install LibTIFF:
sudo yum install -y libtiff
Now we can test:
wkhtmltopdf https://majestic.cloud majestic.pdf
Now you can generate PDF files.
On Node SDK
Node js tools for working with the Hyperledger Fabric network are presented in the form of «fabric-ca-client -v 1.4.0» and «fabric-network» v 1.4.0 «packages. All back-end services, which interact with the network through the Node SDK, located in the Services folder, at the root of the project.
You can read more about these tools and their methods in the official documentation.
Flow applications
It’s worth talking now about how network members interact with each other in this application. All processes are described in a UML diagram. Let us dwell on each of them in more detail.

Fig. 5. Graphical description of business processes in the application
As we have already indicated there are several organizations present in the network: Parents, Hospital and Kindergarten.
A member of the ‘Parents’ organization creates electronic health records for two of his children. This data will be stored (and supplemented) in the blockchain network. Next, the parent sends a request for an agreement with the pediatrician, who will observe his children until they reach adulthood (in the diagram — request for an agreement with a doctor).
A member of the Hospital organization signs this agreement (in the diagram — doctor signs an agreement).
Next, the parent sends a request to kindergarten with a request to enroll his child (in the diagram — request for kindergarten to receive a child).

Fig. 6. Page with a list of available educational institutions in the parent's personal account
Kindergarten sees the request in the list of new requests:
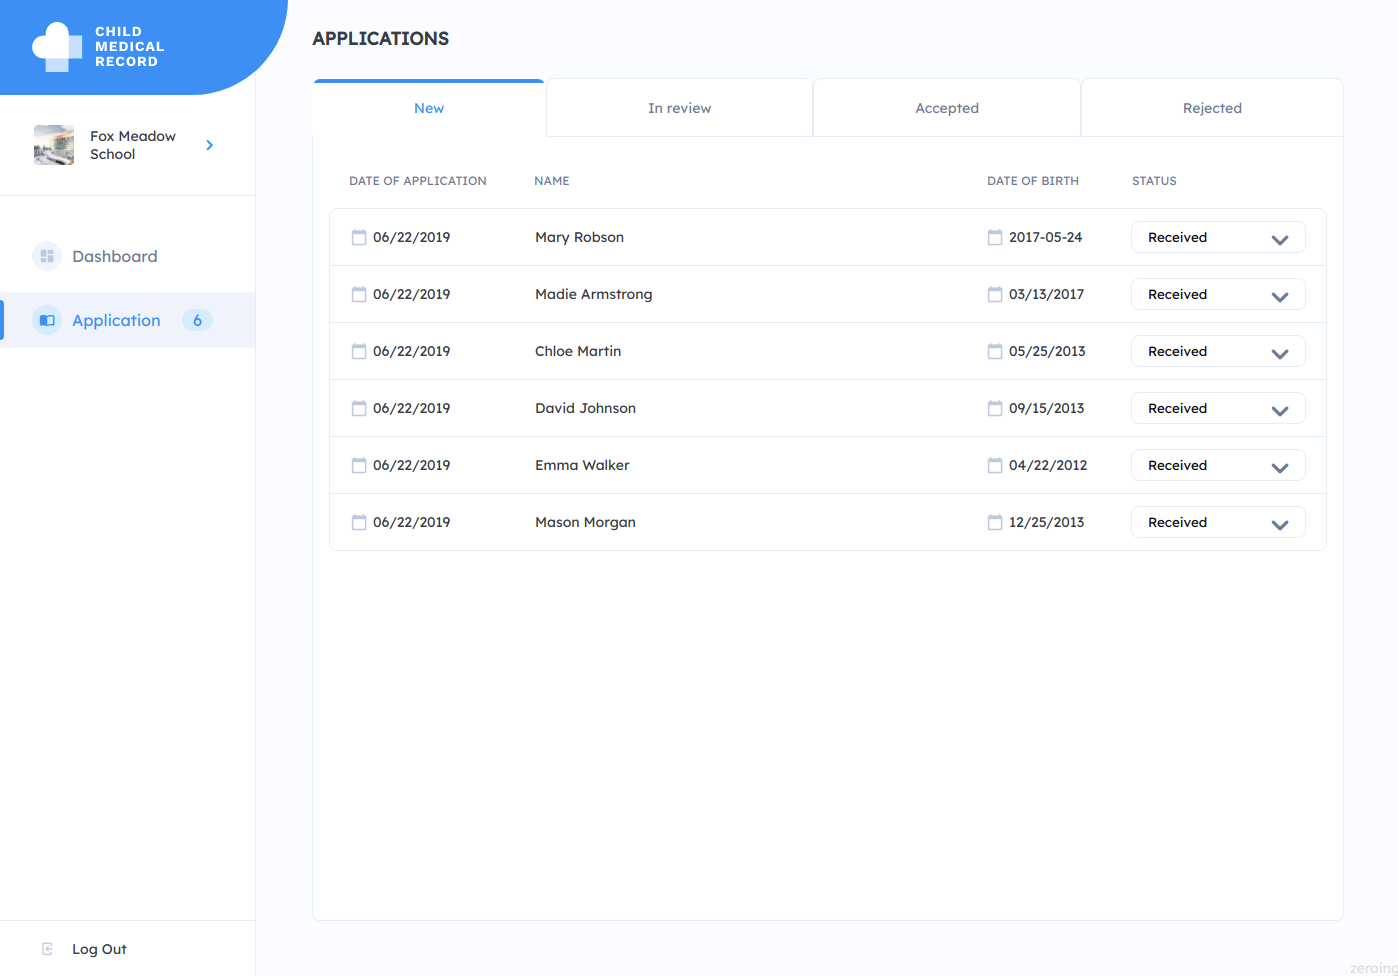
Fig. 7. Page with a list of applications for admission in the personal account of the educational institution
In turn, Kindergarten before deciding whether to enroll a child must ensure that he is in a satisfactory state of health. To do so, the kindergarten sends a request to the clinic in which this child is observed (in the diagram — child health report request). The request to the pediatrician is executed automatically after the request for admission to the garden is moved to the «Accepted» tab.

Fig. 8. A page with a list of approved applications for admission to the personal account of the educational institution
The pediatrician sees the request and generates a report that stores data on the child’s health (in the diagram — child health report created).

Fig. 9. A page with a list of applications for creating a report on the state of the child’s health in the personal account of the hospital
A parent sees a pediatrician’s report.

Fig. 10. A page in the parent’s personal account, which displays the status of reports on the child’s health
and makes a decision to provide access to the preschool educational institution to view and download the report (in the diagram — give permission to view the report).
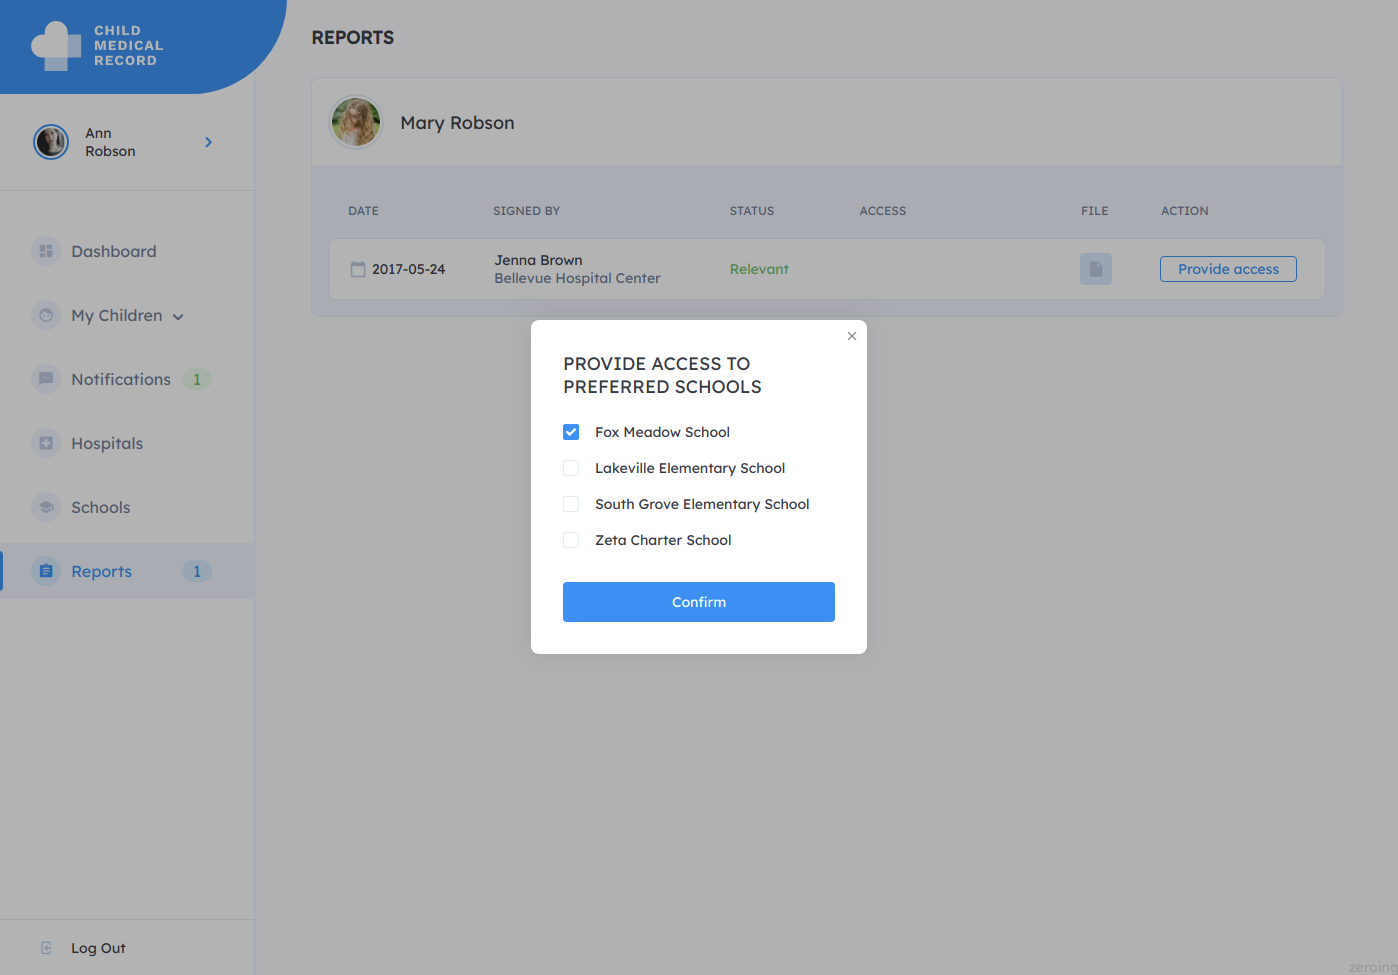
Fig. 11. A pop-up window for choosing an educational institution that can view the generated medical report
and confirms sending the report.

Fig. 12. Notification that the selected educational institution has received permission to view a medical report
Information that the report has been generated and is available for viewing and downloading in PDF format appears in the list of reports in the application of the educational institution.
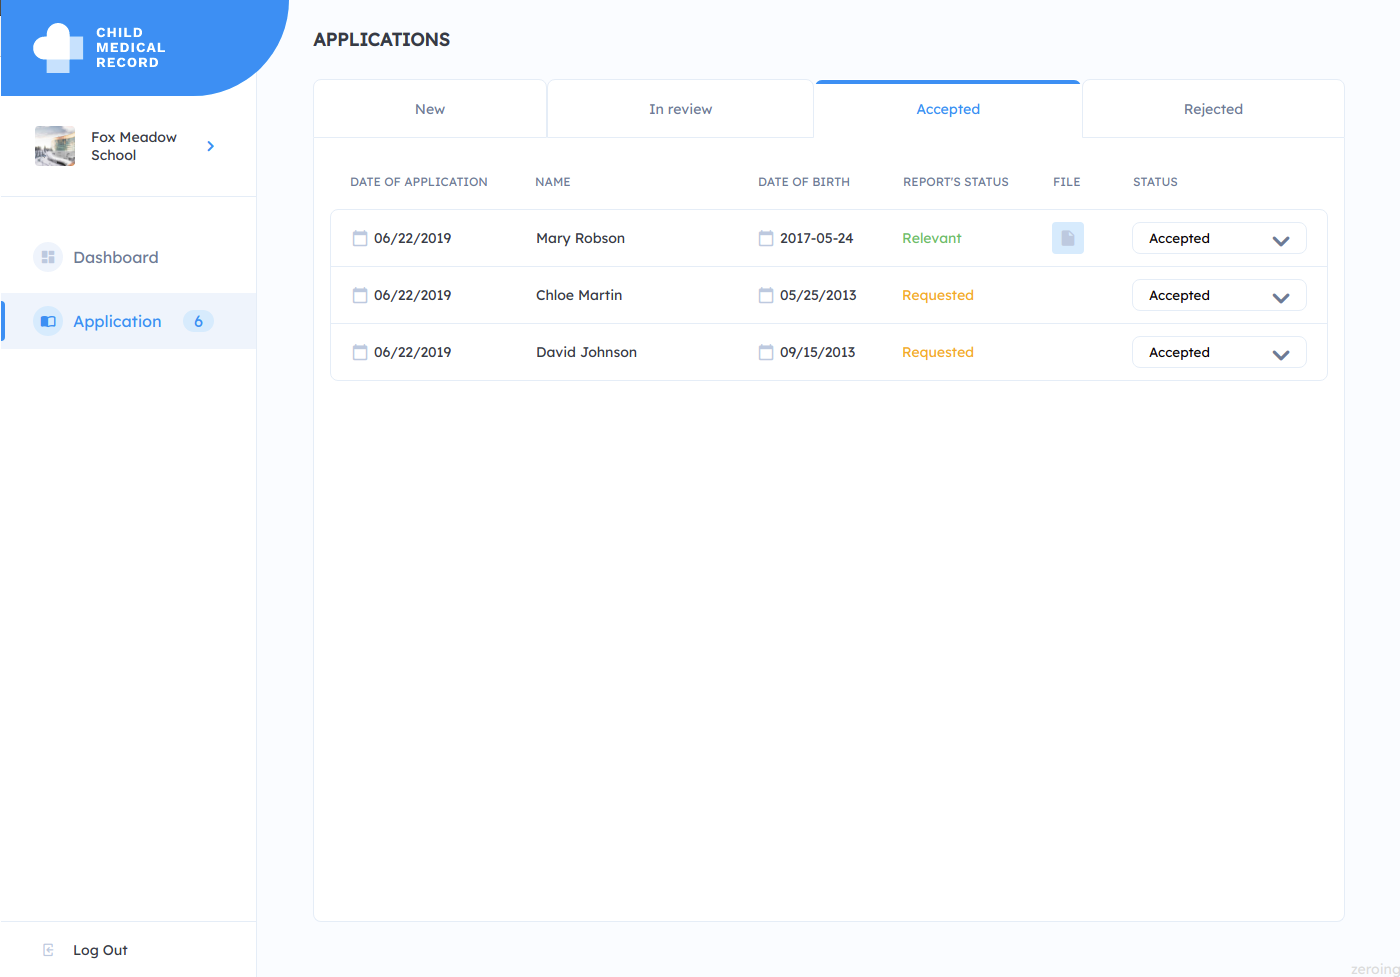
Fig. 13. Link to download the report in PDF format
Here is a report you will see in a new tab of your computer.

Fig. 14. A report on the state of the child’s health formed by the hospital employee
Creation of medical records and agreements with the pediatrician, signing of the agreement
Since this application is designed specifically to demonstrate the deployment of the network on separate EC2 servers, we will execute some commands from prepared scripts.
First EC2 Server:
node ~/back/generators/setCards.js
We previously connected to the database. After executing this command, you will see two entries in the Cards table. Also, information about the medical data of these two children was recorded on the blockchain.
Also from this EC2 server we need to create an agreement with a pediatrician who will observe these children. Let's do that:
node ~/back/generators/createAgreement.js
Now this agreement must be signed by the user which we created for the organization Hospital. We execute the command from the second host:
node ~/back/generators/signAgreement.js
The agreement is signed by the doctor and we can continue to work on our application. Next, we need to install the frontend application on 2, 3 and 4 EC2 servers.
P.S .: You can find all the commands for generating users, cards, agreements and signing agreements in the ~ / back / generators folder.
Front Application for the ‘Parents’ organization
Run the following command on the second host (where the Parents organization is located):
cd ~
git clone https://github.com/nixsolutions/blockchain-poc-frontend.git
Then correct the host name on which the front-end application will be located:
VUE_APP_API_BASE_URL='http://ec2-107-22-75-46.compute-1.amazonaws.com:3006/'You also need to install the dependencies:
cd front
npm install
It is also necessary to build the application and run it on the port 8080:
docker build . -t my-app
docker run -d -p 8080:80 my-app
The application will be available at: http: // <HOST_2>: 8080, where <HOST_2> is the address of the second EC2 server on which this application is located.
Login: parents. Login Password: password
This is what the front-end will look like. Here you will see information about the medical cards that we created from the terminal.

Fig. 15. Information on the children’s medical records in the personal account of the parent
Front Application for the ‘Hospital’ Organization
Run the following command on the second host (where the Hospital organization is located):
cd ~
git clone https://github.com/nixsolutions/blockchain-poc-frontend.git
Then correct the host name on which the front-end application will be located:
VUE_APP_API_BASE_URL='http://ec2-3-91-238-161.compute-1.amazonaws.com:3006/'You also need to install the dependencies:
cd front
npm install
It is also necessary to build the application and run it on port 8080:
docker build . -t my-app
docker run -d -p 8080:80 my-app
The application will be available at: http: // <HOST_3>: 8080, where <HOST_3> is the address of the second EC2 server on which this application is located.
Login: hospital. Login Password: password
This is what the front-end will look like. Here you will see information about the medical cards that we created from the terminal.
Front Application for the ‘Kindergarten’ Organization
Run the following command on the second host (where the Kindergarten organization is located):
Then correct the host name on which the front-end application will be located:
VUE_APP_API_BASE_URL='http://ec2-107-22-12-137.compute-1.amazonaws.com:3006/'You also need to install the dependencies:
cd front
npm install
It is also necessary to build the application and run it on port 8080:
docker build . -t my-app
docker run -d -p 8080:80 my-app
The application will be available at: http: // <HOST_4>: 8080, where <HOST_4> is the address of the second EC2 server on which this application is located.
Login: kindergarten. Login Password: password
Conclusion
This article shows how to deploy a blockchain application network on multiple virtual or physical servers. You will like the article if you are familiar with the basics of blockchain technology, know what smart contracts are, and at least a bit familiar with the Hyperledger Fabric framework and its standard fabric-samples application.
