Introduction & Recap
In the previous blog post, we started designing our application rendering a table with some Business Partner. We learned what OData protocol is, how to read an OData XML manifest, how to bind data to a Table and how to customize columns layout based on different screen resolution.
What will be covered on this exercise
With Part 2 of this series of blog posts, we will learn how to interact with data in our Tables and List. We will learn how to filter and sort data in a smart way.
- Create JSONModel to handle local data
- Set a default sizeLimit to our JSONModel
- FilterBar: UI control that displays filters in a user-friendly manner to populate values for a query
- Use XML Fragments to create a View Settings Dialog to handle sort and group data
- Filter and Sort data
- Add an Info Toolbar to our table to display useful information
Let’s code
FilterBar
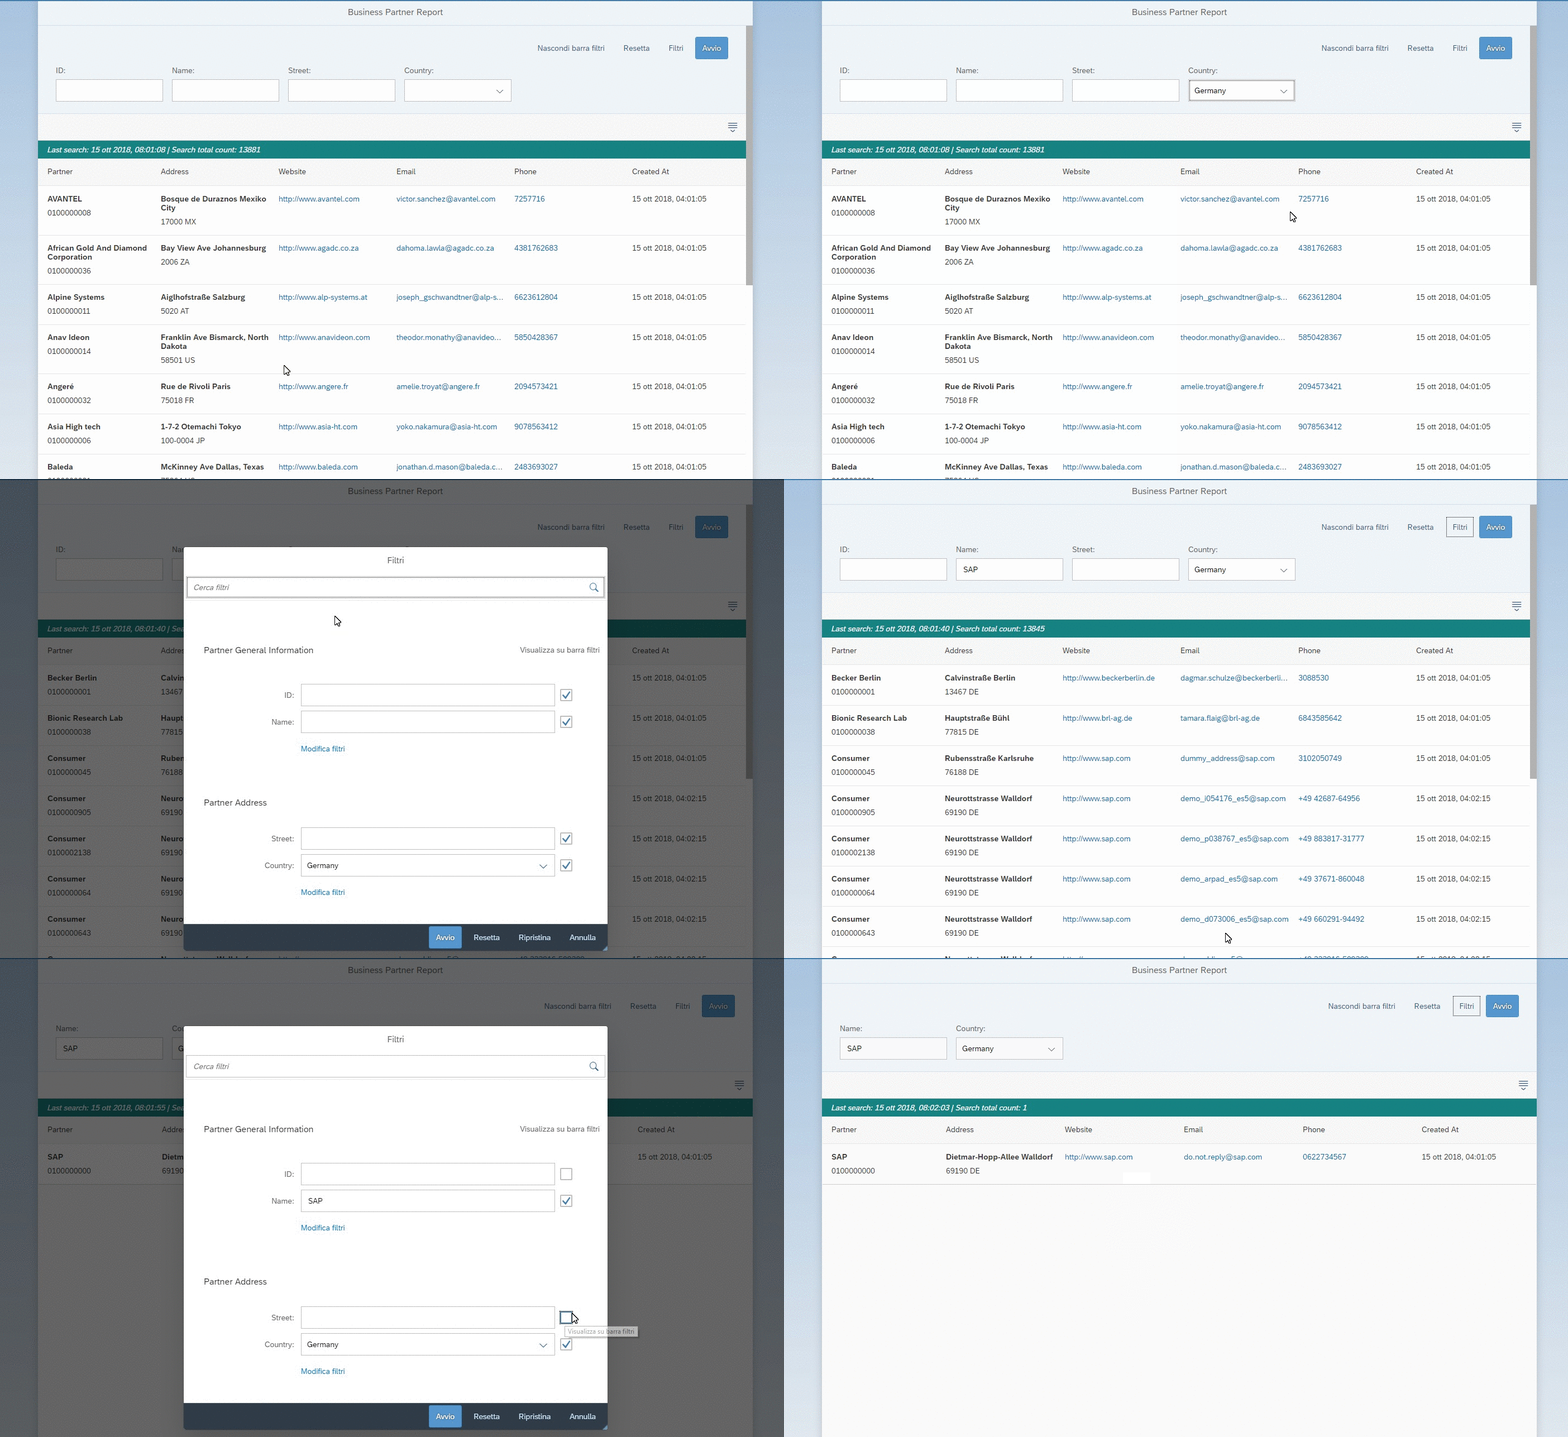
The first thing we want to do is to allow users to filter the Business Partner list displayed on our table. Most of the time we have a really large data (our Business Partner set is made of 13880 records) set to display and the user wants to just filter all those records based on some useful information.
Rule of thumb: do not display filter input for pieces of information that aren’t displayed in your table/list
To do so you need to add a FilterBar above your table. This UI control is only available on SAPUI5 and not in OpenUI5.
FilterBar allows you to group filter in an ordered manner. This UI control is always used with a Variant Manager that I will not cover this time.

Add four different filter:
- ID: Input that will filter the BusinessPartnerID attribute
- Name: Input that will filter the CompanyName attribute
- Street: Input that will
- Country: Select (country code list JSON) to filter Address/Country attribute
After you will have added those input to the FilterBar what you need to do is to bind to the “search” and “clear” events. The first one will be triggered when the user starts a search, the second one when you will have to clear all the filters and start a blank search.
Filters must be exclusive with each other. If the user has added “SAP” in the company name and “IT” in the country code your table should filter for a query like
Give me all the Business Partner with a Name containing “SAP” and with a country code equals to “DE”
JSONModel
We already said that in SAPUI5 you have to different kind of models:
- ODataModel v2: model implementation based on the OData protocol (version 2). It is used when you need to interact with an OData service.
- JSONModel: model implementation for JSON data. It’s mostly used to handle local/temporary data
For our exercise, I suggest you create one JSONModel to store filter data and another one to store country codes. When you have created a local JSON file inside your model folder you can easily import them from the _manifest.json_that will handle all the logic to pre-load information when your app will start.
Filter
new sap.ui.model.Filter(vFilterInfo, vOperator?, vValue1?, vValue2?)
Filter is a powerful tool, it allows you to mix different filters to create complex OData query that will be then translated in SQL on the backend side.
- The first parameter is the column name you want to filter on. You can also specify a column from an expanded property like “Address/Street”
- The second parameter is the operation you would like to apply to your filter. You can find all the possible operations on the FilterOperatordocumentation.
- The third and fourth parameter are query values inputted by the user and that you want to filter on.
The second constructor of the Filter allows you to mix filters in order to create groups of AND and OR filter.
new sap.ui.model.Filter(aFilters, bAnd)
After you have created your final Filter you can apply it to the Table binding.
Sort and Group
A user always wants to also sort/group record based on a specific column and they work more or less like Filter.
new sap.ui.model.Sorter(sPath, bDescending?, vGroup?, fnComparator?)
- The first parameter (as for Filter) is the OData attribute you want to sort on
- The second parameter (boolean) will sort data in a Descending or Ascending way
- The third parameter can be both a boolean (if you want to regroup data) or a function (I will explain this in a moment).
- The last parameter is optional and allows you to do a local (not on OData) custom sort based on the function result
The vGroup parameter is important because allows you to specify a custom way to re-group items. You just need to implement a custom function that returns a JavaScript object with a key and a text value inside.
- Key will be used by SAPUI5 to understand if the record is contained already in a group with the same key value
- Text is used by SAPUI5 to create the UI to show the group name
This function is particularly important when you want to regroup items for special values like dates. Each JavaScript date is different because it handles data to the millisecond. In this case, you could format the date to only show year-month-day and items will be grouped correctly for the date.
Try to just group for “CreatedAt” attribute without a custom function and see what happens ;)
Sorting and Grouping: UI/UX
The best way to allow a user to sort and group data in your table/list is to use the ViewSettingsDialog.

It’s pretty easy to define and configure and gives you a lot of control. ViewSettingsDialog is embedded inside a Fragment and it’s displayed as a Dialog/Popover.
Usually, when you want to display a dialog like this you just need to create your fragment definition in a file (like ViewSettingDialog.fragment.xml) and loaded when the user clicks on the button above the table.
When we’re talking about Fragments we need to pay a lot of attention about two things:
- Re-use of resources
- Lifecycle dependency
Both of them allows you to not waste resourced and to not create memory leaks (and you really don’t want to deal with them!)
So:
- Create a new sap.ui.xmlfragment only when needed (when the variable that holds the reference is not null or destroyed) otherwise just reuse it and open the dialog
- Remember to destroy the dialog when needed like when the dialog closes if you’re using the same variable for different fragments or on the exit event of the controller
Info Toolbar
The InfoToolbar is a Toolbar that is handled by the ListBase (class that is extended by the Table) and usually is displayed below the header (it’s inside the infoToolbar aggregation). It’s very useful when you want to show some pieces of information that need to be highlighted.
In our case, when the user performs a search we’re going to display the latest timestamp of the search and how many records have been filtered in total.
Conclusion and what’s next in Part 3?
If you want to checkout the final result you can directly go to the step_2 branch of our GitHub Project.
In the next part of the exercise, we will introduce the concept of SplitApp and Master-Detail layout so you better start reading some new documentation ;)