
В настоящее время REST API стал стандартом разработки web-приложений, позволяя разбить разработку на независимые части. Для UI на данный момент используются различные популярные фреймворки типа Angular, React, Vue и другие. Разработчики же backend могут выбрать из большого разнообразия языков и фреймворков. Сегодня я бы хотел поговорить о таком фреймворке как NestJS. Мы в TestMace активно используем его для внутренних проектов. Используя nest и пакет @nestjsx/crud, мы создадим простое CRUD приложение.
Почему NestJS
В последнее время в JavaScript сообществе появилось достаточно много backend фреймворков. И если в плане функционала они предоставляют схожие с Nest возможности, то в одном он точно выигрывает — это архитектура. Следующие возможности NestJS позволяют создавать промышленные приложения и масштабировать разработку на большие команды:
- использование TypeScript в качестве основного языка разработки. Хотя NestJS и поддерживает JavaScript, часть функционала может не работать, особенно если речь идет о сторонних пакетах;
- наличие DI контейнера, что позволяет создавать слабосвязанные компоненты;
- функционал самого фреймворка разбит на независимые взаимозаменяемые компоненты. Например, под капотом в качестве фреймворка может использоваться как express, так и fastify, для работы с БД nest из коробки предоставляет биндинги к typeorm, mongoose, sequelize;
- NestJS не зависит от платформы и поддерживает REST, GraphQL, Websockets, gRPC и т.д.
Сам фреймворк вдохновлен frontend фреймворком Angular и концептуально имеет много общего с ним.
Установка NestJS и развертывание проекта
Nest содержит пакет nest/cli, который позволяет быстро развернуть базовый каркас приложения. Установим глобально данный пакет:
npm install --global @nest/cliПосле установки сгенерируем базовый каркас нашего приложения с именем nest-rest. Делается это с использование команды nest new nest-rest.
dmitrii@dmitrii-HP-ZBook-17-G3:~/projects $ nest new nest-rest
  We will scaffold your app in a few seconds..

CREATE /nest-rest/.prettierrc (51 bytes)
CREATE /nest-rest/README.md (3370 bytes)
CREATE /nest-rest/nest-cli.json (84 bytes)
CREATE /nest-rest/nodemon-debug.json (163 bytes)
CREATE /nest-rest/nodemon.json (67 bytes)
CREATE /nest-rest/package.json (1805 bytes)
CREATE /nest-rest/tsconfig.build.json (97 bytes)
CREATE /nest-rest/tsconfig.json (325 bytes)
CREATE /nest-rest/tslint.json (426 bytes)
CREATE /nest-rest/src/app.controller.spec.ts (617 bytes)
CREATE /nest-rest/src/app.controller.ts (274 bytes)
CREATE /nest-rest/src/app.module.ts (249 bytes)
CREATE /nest-rest/src/app.service.ts (142 bytes)
CREATE /nest-rest/src/main.ts (208 bytes)
CREATE /nest-rest/test/app.e2e-spec.ts (561 bytes)
CREATE /nest-rest/test/jest-e2e.json (183 bytes)

? Which package manager would you ️ to use? yarn
 Installation in progress...

  Successfully created project nest-rest
  Get started with the following commands:

$ cd nest-rest
$ yarn run start

                          Thanks for installing Nest
                 Please consider donating to our open collective
                        to help us maintain this package.

                 Donate: https://opencollective.com/nest
В качестве пакетного менеджера мы выберем yarn.
На данный момент вы можете запустить сервер командой npm start и пройдя по адресу http://localhost:3000 можете лицезреть главную страницу. Однако мы не для этого здесь собрались и двигаемся дальше.
Настраиваем работу с базой
В качестве СУБД для данной статьи я выбрал PostrgreSQL. О вкусах не спорят, по моему мнению, это наиболее зрелая СУБД, обладающая всеми необходимыми возможностями. Как уже было сказано, для работы с базами данных Nest предоставляет интеграцию с различными пакетами. Т.к. мой выбор пал на PostgreSQL, то логично будет выбрать TypeORM в качестве ORM. Установим необходимые пакеты для интеграции с базой данных:
yarn add typeorm @nestjs/typeorm pg
По порядку, для чего нужен каждый пакет:
- typeorm — пакет непосредственно с самой ORM;
- @nestjs/typeorm — TypeORM пакет для NestJS. Добавляет модули для импортирования в модули проекта, а также набор декораторов-хелперов;
- pg — драйвер для работы с PostgreSQL.
Окей, пакеты установлены, теперь необходимо запустить саму базу. Для развертывания базы я буду использовать docker-compose.yml следующего содержания:
version: '3.1'

services:
  db:
    image: postgres:11.2
    restart: always
    environment:
      POSTGRES_PASSWORD: example
    volumes:
      - ../db:/var/lib/postgresql/data
      - ./postgresql.conf:/etc/postgresql/postgresql.conf
    ports:
      - 5432:5432
  adminer:
    image: adminer
    restart: always
    ports:
      - 8080:8080
Как можно видеть, данный файл конфигурирует запуск 2 контейнеров:
- db — это контейнер непосредственно с базой данных. В нашем случае используется postgresql версии 11.2;
- adminer — менеджер работы с базой данных. Предоставляет web-интерфейс для просмотра и управления базой.
Для работы с подключениям по tcp я добавил конфиг следующего содержания.
# -----------------------------
# PostgreSQL configuration file
# -----------------------------
#
# This file consists of lines of the form:
#
# name = value
#
# (The "=" is optional.) Whitespace may be used. Comments are introduced with
# "#" anywhere on a line. The complete list of parameter names and allowed
# values can be found in the PostgreSQL documentation.
#
# The commented-out settings shown in this file represent the default values.
# Re-commenting a setting is NOT sufficient to revert it to the default value;
# you need to reload the server.
#
# This file is read on server startup and when the server receives a SIGHUP
# signal. If you edit the file on a running system, you have to SIGHUP the
# server for the changes to take effect, run "pg_ctl reload", or execute
# "SELECT pg_reload_conf()". Some parameters, which are marked below,
# require a server shutdown and restart to take effect.
#
# Any parameter can also be given as a command-line option to the server, e.g.,
# "postgres -c log_connections=on". Some parameters can be changed at run time
# with the "SET" SQL command.
#
# Memory units: kB = kilobytes Time units: ms = milliseconds
# MB = megabytes s = seconds
# GB = gigabytes min = minutes
# TB = terabytes h = hours
# d = days
#------------------------------------------------------------------------------
# FILE LOCATIONS
#------------------------------------------------------------------------------
# The default values of these variables are driven from the -D command-line
# option or PGDATA environment variable, represented here as ConfigDir.
#data_directory = 'ConfigDir' # use data in another directory
# (change requires restart)
#hba_file = 'ConfigDir/pg_hba.conf' # host-based authentication file
# (change requires restart)
#ident_file = 'ConfigDir/pg_ident.conf' # ident configuration file
# (change requires restart)
# If external_pid_file is not explicitly set, no extra PID file is written.
#external_pid_file = '' # write an extra PID file
# (change requires restart)
#------------------------------------------------------------------------------
# CONNECTIONS AND AUTHENTICATION
#------------------------------------------------------------------------------
# - Connection Settings -
listen_addresses = '*'
#listen_addresses = 'localhost' # what IP address(es) to listen on;
# comma-separated list of addresses;
# defaults to 'localhost'; use '*' for all
# (change requires restart)
#port = 5432 # (change requires restart)
#max_connections = 100 # (change requires restart)
#superuser_reserved_connections = 3 # (change requires restart)
#unix_socket_directories = '/tmp' # comma-separated list of directories
# (change requires restart)
#unix_socket_group = '' # (change requires restart)
#unix_socket_permissions = 0777 # begin with 0 to use octal notation
# (change requires restart)
#bonjour = off # advertise server via Bonjour
# (change requires restart)
#bonjour_name = '' # defaults to the computer name
# (change requires restart)
# - TCP Keepalives -
# see "man 7 tcp" for details
#tcp_keepalives_idle = 0 # TCP_KEEPIDLE, in seconds;
# 0 selects the system default
#tcp_keepalives_interval = 0 # TCP_KEEPINTVL, in seconds;
# 0 selects the system default
#tcp_keepalives_count = 0 # TCP_KEEPCNT;
# 0 selects the system default
# - Authentication -
#authentication_timeout = 1min # 1s-600s
#password_encryption = md5 # md5 or scram-sha-256
#db_user_namespace = off
# GSSAPI using Kerberos
#krb_server_keyfile = ''
#krb_caseins_users = off
# - SSL -
#ssl = off
#ssl_ca_file = ''
#ssl_cert_file = 'server.crt'
#ssl_crl_file = ''
#ssl_key_file = 'server.key'
#ssl_ciphers = 'HIGH:MEDIUM:+3DES:!aNULL' # allowed SSL ciphers
#ssl_prefer_server_ciphers = on
#ssl_ecdh_curve = 'prime256v1'
#ssl_min_protocol_version = 'TLSv1'
#ssl_max_protocol_version = ''
#ssl_dh_params_file = ''
#ssl_passphrase_command = ''
#ssl_passphrase_command_supports_reload = off
#------------------------------------------------------------------------------
# RESOURCE USAGE (except WAL)
#------------------------------------------------------------------------------
# - Memory -
#shared_buffers = 32MB # min 128kB
# (change requires restart)
#huge_pages = try # on, off, or try
# (change requires restart)
#temp_buffers = 8MB # min 800kB
#max_prepared_transactions = 0 # zero disables the feature
# (change requires restart)
# Caution: it is not advisable to set max_prepared_transactions nonzero unless
# you actively intend to use prepared transactions.
#work_mem = 4MB # min 64kB
#maintenance_work_mem = 64MB # min 1MB
#autovacuum_work_mem = -1 # min 1MB, or -1 to use maintenance_work_mem
#max_stack_depth = 2MB # min 100kB
#shared_memory_type = mmap # the default is the first option
# supported by the operating system:
# mmap
# sysv
# windows
# (change requires restart)
#dynamic_shared_memory_type = posix # the default is the first option
# supported by the operating system:
# posix
# sysv
# windows
# mmap
# (change requires restart)
# - Disk -
#temp_file_limit = -1 # limits per-process temp file space
# in kB, or -1 for no limit
# - Kernel Resources -
#max_files_per_process = 1000 # min 25
# (change requires restart)
# - Cost-Based Vacuum Delay -
#vacuum_cost_delay = 0 # 0-100 milliseconds (0 disables)
#vacuum_cost_page_hit = 1 # 0-10000 credits
#vacuum_cost_page_miss = 10 # 0-10000 credits
#vacuum_cost_page_dirty = 20 # 0-10000 credits
#vacuum_cost_limit = 200 # 1-10000 credits
# - Background Writer -
#bgwriter_delay = 200ms # 10-10000ms between rounds
#bgwriter_lru_maxpages = 100 # max buffers written/round, 0 disables
#bgwriter_lru_multiplier = 2.0 # 0-10.0 multiplier on buffers scanned/round
#bgwriter_flush_after = 0 # measured in pages, 0 disables
# - Asynchronous Behavior -
#effective_io_concurrency = 1 # 1-1000; 0 disables prefetching
#max_worker_processes = 8 # (change requires restart)
#max_parallel_maintenance_workers = 2 # taken from max_parallel_workers
#max_parallel_workers_per_gather = 2 # taken from max_parallel_workers
#parallel_leader_participation = on
#max_parallel_workers = 8 # maximum number of max_worker_processes that
# can be used in parallel operations
#old_snapshot_threshold = -1 # 1min-60d; -1 disables; 0 is immediate
# (change requires restart)
#backend_flush_after = 0 # measured in pages, 0 disables
#------------------------------------------------------------------------------
# WRITE-AHEAD LOG
#------------------------------------------------------------------------------
# - Settings -
#wal_level = replica # minimal, replica, or logical
# (change requires restart)
#fsync = on # flush data to disk for crash safety
# (turning this off can cause
# unrecoverable data corruption)
#synchronous_commit = on # synchronization level;
# off, local, remote_write, remote_apply, or on
#wal_sync_method = fsync # the default is the first option
# supported by the operating system:
# open_datasync
# fdatasync (default on Linux)
# fsync
# fsync_writethrough
# open_sync
#full_page_writes = on # recover from partial page writes
#wal_compression = off # enable compression of full-page writes
#wal_log_hints = off # also do full page writes of non-critical updates
# (change requires restart)
#wal_buffers = -1 # min 32kB, -1 sets based on shared_buffers
# (change requires restart)
#wal_writer_delay = 200ms # 1-10000 milliseconds
#wal_writer_flush_after = 1MB # measured in pages, 0 disables
#commit_delay = 0 # range 0-100000, in microseconds
#commit_siblings = 5 # range 1-1000
# - Checkpoints -
#checkpoint_timeout = 5min # range 30s-1d
#max_wal_size = 1GB
#min_wal_size = 80MB
#checkpoint_completion_target = 0.5 # checkpoint target duration, 0.0 - 1.0
#checkpoint_flush_after = 0 # measured in pages, 0 disables
#checkpoint_warning = 30s # 0 disables
# - Archiving -
#archive_mode = off # enables archiving; off, on, or always
# (change requires restart)
#archive_command = '' # command to use to archive a logfile segment
# placeholders: %p = path of file to archive
# %f = file name only
# e.g. 'test ! -f /mnt/server/archivedir/%f && cp %p /mnt/server/archivedir/%f'
#archive_timeout = 0 # force a logfile segment switch after this
# number of seconds; 0 disables
# - Archive Recovery -
# These are only used in recovery mode.
#restore_command = '' # command to use to restore an archived logfile segment
# placeholders: %p = path of file to restore
# %f = file name only
# e.g. 'cp /mnt/server/archivedir/%f %p'
# (change requires restart)
#archive_cleanup_command = '' # command to execute at every restartpoint
#recovery_end_command = '' # command to execute at completion of recovery
# - Recovery Target -
# Set these only when performing a targeted recovery.
#recovery_target = '' # 'immediate' to end recovery as soon as a
# consistent state is reached
# (change requires restart)
#recovery_target_name = '' # the named restore point to which recovery will proceed
# (change requires restart)
#recovery_target_time = '' # the time stamp up to which recovery will proceed
# (change requires restart)
#recovery_target_xid = '' # the transaction ID up to which recovery will proceed
# (change requires restart)
#recovery_target_lsn = '' # the WAL LSN up to which recovery will proceed
# (change requires restart)
#recovery_target_inclusive = on # Specifies whether to stop:
# just after the specified recovery target (on)
# just before the recovery target (off)
# (change requires restart)
#recovery_target_timeline = 'latest' # 'current', 'latest', or timeline ID
# (change requires restart)
#recovery_target_action = 'pause' # 'pause', 'promote', 'shutdown'
# (change requires restart)
#------------------------------------------------------------------------------
# REPLICATION
#------------------------------------------------------------------------------
# - Sending Servers -
# Set these on the master and on any standby that will send replication data.
#max_wal_senders = 10 # max number of walsender processes
# (change requires restart)
#wal_keep_segments = 0 # in logfile segments; 0 disables
#wal_sender_timeout = 60s # in milliseconds; 0 disables
#max_replication_slots = 10 # max number of replication slots
# (change requires restart)
#track_commit_timestamp = off # collect timestamp of transaction commit
# (change requires restart)
# - Master Server -
# These settings are ignored on a standby server.
#synchronous_standby_names = '' # standby servers that provide sync rep
# method to choose sync standbys, number of sync standbys,
# and comma-separated list of application_name
# from standby(s); '*' = all
#vacuum_defer_cleanup_age = 0 # number of xacts by which cleanup is delayed
# - Standby Servers -
# These settings are ignored on a master server.
#primary_conninfo = '' # connection string to sending server
# (change requires restart)
#primary_slot_name = '' # replication slot on sending server
# (change requires restart)
#promote_trigger_file = '' # file name whose presence ends recovery
#hot_standby = on # "off" disallows queries during recovery
# (change requires restart)
#max_standby_archive_delay = 30s # max delay before canceling queries
# when reading WAL from archive;
# -1 allows indefinite delay
#max_standby_streaming_delay = 30s # max delay before canceling queries
# when reading streaming WAL;
# -1 allows indefinite delay
#wal_receiver_status_interval = 10s # send replies at least this often
# 0 disables
#hot_standby_feedback = off # send info from standby to prevent
# query conflicts
#wal_receiver_timeout = 60s # time that receiver waits for
# communication from master
# in milliseconds; 0 disables
#wal_retrieve_retry_interval = 5s # time to wait before retrying to
# retrieve WAL after a failed attempt
#recovery_min_apply_delay = 0 # minimum delay for applying changes during recovery
# - Subscribers -
# These settings are ignored on a publisher.
#max_logical_replication_workers = 4 # taken from max_worker_processes
# (change requires restart)
#max_sync_workers_per_subscription = 2 # taken from max_logical_replication_workers
#------------------------------------------------------------------------------
# QUERY TUNING
#------------------------------------------------------------------------------
# - Planner Method Configuration -
#enable_bitmapscan = on
#enable_hashagg = on
#enable_hashjoin = on
#enable_indexscan = on
#enable_indexonlyscan = on
#enable_material = on
#enable_mergejoin = on
#enable_nestloop = on
#enable_parallel_append = on
#enable_seqscan = on
#enable_sort = on
#enable_tidscan = on
#enable_partitionwise_join = off
#enable_partitionwise_aggregate = off
#enable_parallel_hash = on
#enable_partition_pruning = on
# - Planner Cost Constants -
#seq_page_cost = 1.0 # measured on an arbitrary scale
#random_page_cost = 4.0 # same scale as above
#cpu_tuple_cost = 0.01 # same scale as above
#cpu_index_tuple_cost = 0.005 # same scale as above
#cpu_operator_cost = 0.0025 # same scale as above
#parallel_tuple_cost = 0.1 # same scale as above
#parallel_setup_cost = 1000.0 # same scale as above
#jit_above_cost = 100000 # perform JIT compilation if available
# and query more expensive than this;
# -1 disables
#jit_inline_above_cost = 500000 # inline small functions if query is
# more expensive than this; -1 disables
#jit_optimize_above_cost = 500000 # use expensive JIT optimizations if
# query is more expensive than this;
# -1 disables
#min_parallel_table_scan_size = 8MB
#min_parallel_index_scan_size = 512kB
#effective_cache_size = 4GB
# - Genetic Query Optimizer -
#geqo = on
#geqo_threshold = 12
#geqo_effort = 5 # range 1-10
#geqo_pool_size = 0 # selects default based on effort
#geqo_generations = 0 # selects default based on effort
#geqo_selection_bias = 2.0 # range 1.5-2.0
#geqo_seed = 0.0 # range 0.0-1.0
# - Other Planner Options -
#default_statistics_target = 100 # range 1-10000
#constraint_exclusion = partition # on, off, or partition
#cursor_tuple_fraction = 0.1 # range 0.0-1.0
#from_collapse_limit = 8
#join_collapse_limit = 8 # 1 disables collapsing of explicit
# JOIN clauses
#force_parallel_mode = off
#jit = on # allow JIT compilation
#plan_cache_mode = auto # auto, force_generic_plan or
# force_custom_plan
#------------------------------------------------------------------------------
# REPORTING AND LOGGING
#------------------------------------------------------------------------------
# - Where to Log -
#log_destination = 'stderr' # Valid values are combinations of
# stderr, csvlog, syslog, and eventlog,
# depending on platform. csvlog
# requires logging_collector to be on.
# This is used when logging to stderr:
#logging_collector = off # Enable capturing of stderr and csvlog
# into log files. Required to be on for
# csvlogs.
# (change requires restart)
# These are only used if logging_collector is on:
#log_directory = 'log' # directory where log files are written,
# can be absolute or relative to PGDATA
#log_filename = 'postgresql-%Y-%m-%d_%H%M%S.log' # log file name pattern,
# can include strftime() escapes
#log_file_mode = 0600 # creation mode for log files,
# begin with 0 to use octal notation
#log_truncate_on_rotation = off # If on, an existing log file with the
# same name as the new log file will be
# truncated rather than appended to.
# But such truncation only occurs on
# time-driven rotation, not on restarts
# or size-driven rotation. Default is
# off, meaning append to existing files
# in all cases.
#log_rotation_age = 1d # Automatic rotation of logfiles will
# happen after that time. 0 disables.
#log_rotation_size = 10MB # Automatic rotation of logfiles will
# happen after that much log output.
# 0 disables.
# These are relevant when logging to syslog:
#syslog_facility = 'LOCAL0'
#syslog_ident = 'postgres'
#syslog_sequence_numbers = on
#syslog_split_messages = on
# This is only relevant when logging to eventlog (win32):
# (change requires restart)
#event_source = 'PostgreSQL'
# - When to Log -
#log_min_messages = warning # values in order of decreasing detail:
# debug5
# debug4
# debug3
# debug2
# debug1
# info
# notice
# warning
# error
# log
# fatal
# panic
#log_min_error_statement = error # values in order of decreasing detail:
# debug5
# debug4
# debug3
# debug2
# debug1
# info
# notice
# warning
# error
# log
# fatal
# panic (effectively off)
#log_min_duration_statement = -1 # logs statements and their durations
# according to log_statement_sample_rate. -1 is disabled,
# 0 logs all statement, > 0 logs only statements running at
# least this number of milliseconds.
#log_statement_sample_rate = 1 # Fraction of logged statements over
# log_min_duration_statement. 1.0 logs all statements,
# 0 never logs.
# - What to Log -
#debug_print_parse = off
#debug_print_rewritten = off
#debug_print_plan = off
#debug_pretty_print = on
#log_checkpoints = off
#log_connections = off
#log_disconnections = off
#log_duration = off
#log_error_verbosity = default # terse, default, or verbose messages
#log_hostname = off
#log_line_prefix = '%m [%p] ' # special values:
# %a = application name
# %u = user name
# %d = database name
# %r = remote host and port
# %h = remote host
# %p = process ID
# %t = timestamp without milliseconds
# %m = timestamp with milliseconds
# %n = timestamp with milliseconds (as a Unix epoch)
# %i = command tag
# %e = SQL state
# %c = session ID
# %l = session line number
# %s = session start timestamp
# %v = virtual transaction ID
# %x = transaction ID (0 if none)
# %q = stop here in non-session
# processes
# %% = '%'
# e.g. '<%u%%%d> '
#log_lock_waits = off # log lock waits >= deadlock_timeout
#log_statement = 'none' # none, ddl, mod, all
#log_replication_commands = off
#log_temp_files = -1 # log temporary files equal or larger
# than the specified size in kilobytes;
# -1 disables, 0 logs all temp files
#log_timezone = 'GMT'
#------------------------------------------------------------------------------
# PROCESS TITLE
#------------------------------------------------------------------------------
#cluster_name = '' # added to process titles if nonempty
# (change requires restart)
#update_process_title = on
#------------------------------------------------------------------------------
# STATISTICS
#------------------------------------------------------------------------------
# - Query and Index Statistics Collector -
#track_activities = on
#track_counts = on
#track_io_timing = off
#track_functions = none # none, pl, all
#track_activity_query_size = 1024 # (change requires restart)
#stats_temp_directory = 'pg_stat_tmp'
# - Monitoring -
#log_parser_stats = off
#log_planner_stats = off
#log_executor_stats = off
#log_statement_stats = off
#------------------------------------------------------------------------------
# AUTOVACUUM
#------------------------------------------------------------------------------
#autovacuum = on # Enable autovacuum subprocess? 'on'
# requires track_counts to also be on.
#log_autovacuum_min_duration = -1 # -1 disables, 0 logs all actions and
# their durations, > 0 logs only
# actions running at least this number
# of milliseconds.
#autovacuum_max_workers = 3 # max number of autovacuum subprocesses
# (change requires restart)
#autovacuum_naptime = 1min # time between autovacuum runs
#autovacuum_vacuum_threshold = 50 # min number of row updates before
# vacuum
#autovacuum_analyze_threshold = 50 # min number of row updates before
# analyze
#autovacuum_vacuum_scale_factor = 0.2 # fraction of table size before vacuum
#autovacuum_analyze_scale_factor = 0.1 # fraction of table size before analyze
#autovacuum_freeze_max_age = 200000000 # maximum XID age before forced vacuum
# (change requires restart)
#autovacuum_multixact_freeze_max_age = 400000000 # maximum multixact age
# before forced vacuum
# (change requires restart)
#autovacuum_vacuum_cost_delay = 2ms # default vacuum cost delay for
# autovacuum, in milliseconds;
# -1 means use vacuum_cost_delay
#autovacuum_vacuum_cost_limit = -1 # default vacuum cost limit for
# autovacuum, -1 means use
# vacuum_cost_limit
#------------------------------------------------------------------------------
# CLIENT CONNECTION DEFAULTS
#------------------------------------------------------------------------------
# - Statement Behavior -
#client_min_messages = notice # values in order of decreasing detail:
# debug5
# debug4
# debug3
# debug2
# debug1
# log
# notice
# warning
# error
#search_path = '"$user", public' # schema names
#row_security = on
#default_tablespace = '' # a tablespace name, '' uses the default
#temp_tablespaces = '' # a list of tablespace names, '' uses
# only default tablespace
#check_function_bodies = on
#default_transaction_isolation = 'read committed'
#default_transaction_read_only = off
#default_transaction_deferrable = off
#session_replication_role = 'origin'
#statement_timeout = 0 # in milliseconds, 0 is disabled
#lock_timeout = 0 # in milliseconds, 0 is disabled
#idle_in_transaction_session_timeout = 0 # in milliseconds, 0 is disabled
#vacuum_freeze_min_age = 50000000
#vacuum_freeze_table_age = 150000000
#vacuum_multixact_freeze_min_age = 5000000
#vacuum_multixact_freeze_table_age = 150000000
#vacuum_cleanup_index_scale_factor = 0.1 # fraction of total number of tuples
# before index cleanup, 0 always performs
# index cleanup
#bytea_output = 'hex' # hex, escape
#xmlbinary = 'base64'
#xmloption = 'content'
#gin_fuzzy_search_limit = 0
#gin_pending_list_limit = 4MB
# - Locale and Formatting -
#datestyle = 'iso, mdy'
#intervalstyle = 'postgres'
#timezone = 'GMT'
#timezone_abbreviations = 'Default' # Select the set of available time zone
# abbreviations. Currently, there are
# Default
# Australia (historical usage)
# India
# You can create your own file in
# share/timezonesets/.
#extra_float_digits = 1 # min -15, max 3; any value >0 actually
# selects precise output mode
#client_encoding = sql_ascii # actually, defaults to database
# encoding
# These settings are initialized by initdb, but they can be changed.
#lc_messages = 'C' # locale for system error message
# strings
#lc_monetary = 'C' # locale for monetary formatting
#lc_numeric = 'C' # locale for number formatting
#lc_time = 'C' # locale for time formatting
# default configuration for text search
#default_text_search_config = 'pg_catalog.simple'
# - Shared Library Preloading -
#shared_preload_libraries = '' # (change requires restart)
#local_preload_libraries = ''
#session_preload_libraries = ''
#jit_provider = 'llvmjit' # JIT library to use
# - Other Defaults -
#dynamic_library_path = '$libdir'
#------------------------------------------------------------------------------
# LOCK MANAGEMENT
#------------------------------------------------------------------------------
#deadlock_timeout = 1s
#max_locks_per_transaction = 64 # min 10
# (change requires restart)
#max_pred_locks_per_transaction = 64 # min 10
# (change requires restart)
#max_pred_locks_per_relation = -2 # negative values mean
# (max_pred_locks_per_transaction
# / -max_pred_locks_per_relation) - 1
#max_pred_locks_per_page = 2 # min 0
#------------------------------------------------------------------------------
# VERSION AND PLATFORM COMPATIBILITY
#------------------------------------------------------------------------------
# - Previous PostgreSQL Versions -
#array_nulls = on
#backslash_quote = safe_encoding # on, off, or safe_encoding
#escape_string_warning = on
#lo_compat_privileges = off
#operator_precedence_warning = off
#quote_all_identifiers = off
#standard_conforming_strings = on
#synchronize_seqscans = on
# - Other Platforms and Clients -
#transform_null_equals = off
#------------------------------------------------------------------------------
# ERROR HANDLING
#------------------------------------------------------------------------------
#exit_on_error = off # terminate session on any error?
#restart_after_crash = on # reinitialize after backend crash?
#data_sync_retry = off # retry or panic on failure to fsync
# data?
# (change requires restart)
#------------------------------------------------------------------------------
# CONFIG FILE INCLUDES
#------------------------------------------------------------------------------
# These options allow settings to be loaded from files other than the
# default postgresql.conf.
#include_dir = 'conf.d' # include files ending in '.conf' from
# directory 'conf.d'
#include_if_exists = 'exists.conf' # include file only if it exists
#include = 'special.conf' # include file
#------------------------------------------------------------------------------
# CUSTOMIZED OPTIONS
#------------------------------------------------------------------------------
# Add settings for extensions hereНа этом все, можно запустить контейнеры командой docker-compose up -d. Либо в отдельной консоли командой docker-compose up.
Итак, пакеты установили, базу запустили, осталось их друг с другом подружить. Для этого нужно в корень проекта добавить файл ormconfig.js следующего содержания:
const process = require('process');

const username = process.env.POSTGRES_USER || "postgres";
const password = process.env.POSTGRES_PASSWORD || "example";

module.exports = {
  "type": "postgres",
  "host": "localhost",
  "port": 5432,
  username,
  password,
  "database": "postgres",
  "synchronize": true,
  "dropSchema": false,
  "logging": true,
  "entities": [__dirname + "/src/**/*.entity.ts", __dirname + "/dist/**/*.entity.js"],
  "migrations": ["migrations/**/*.ts"],
  "subscribers": ["subscriber/**/*.ts", "dist/subscriber/**/.js"],
  "cli": {
    "entitiesDir": "src",
    "migrationsDir": "migrations",
    "subscribersDir": "subscriber"
  }
}
Данная конфигурация будет использоваться для cli typeorm.
Остановимся на данной конфигурации подробнее. В строках 3 и 4 мы получаем имя пользователя и пароль из переменных окружения. Это удобно, когда у вас есть несколько окружений (dev, stage, prod, etc). По умолчанию имя пользователя postgres, пароль — example. В остальном конфиг тривиален, поэтому остановимся только на самых интересных параметрах:
- synchronize — указывает, должна ли схема базы данных автоматически создаваться при запуске приложения. Будьте внимательны с данной опцией и не используйте ее в production, в противном случае вы потеряете данные. Данная опция удобна при разработке и отладке приложения. Как альтернатива данной опции, вы можете использовать команду
schema:syncиз CLI TypeORM. - dropSchema — сбрасывать схему каждый раз, когда устанавливается соединение. Также, как и предыдущую, данную опцию следует использовать только в процессе разработки и отладки приложения.
- entities — по каким путям искать описание моделей. Обратите внимание, что поддерживается поиск по маске.
- cli.entitiesDir — директория, куда по умолчанию должны складываться модели, созданные из CLI TypeORM.
Для того, чтобы мы могли использовать все возможности TypeORM в нашем Nest приложении, необходимо импортировать модуль TypeOrmModule в AppModule. Т.е. ваш AppModule будет выглядеть следующим образом:
import { Module } from '@nestjs/common';
import { AppController } from './app.controller';
import { AppService } from './app.service';
import { TypeOrmModule } from '@nestjs/typeorm';
import * as process from "process";

const username = process.env.POSTGRES_USER || 'postgres';
const password = process.env.POSTGRES_PASSWORD || 'example';

@Module({
  imports: [
    TypeOrmModule.forRoot({
      type: 'postgres',
      host: 'localhost',
      port: 5432,
      username,
      password,
      database: 'postgres',
      entities: [__dirname + '/**/*.entity{.ts,.js}'],
      synchronize: true,
    }),
  ],
  controllers: [AppController],
  providers: [AppService],
})
export class AppModule {}
Как вы успели заметить, в метод forRoot передается та же конфигурация для работы с базой, что и в файле ormconfig.ts
Остался финальный штрих — добавить несколько тасков для работы с TypeORM в package.json. Дело в том, что CLI написана на javascript и запускается в среде nodejs. Однако все наши модели и миграции будут написаны на typescript. Поэтому необходимо провести транспиляцию наших миграций и моделей до использования CLI. Для этого нам понадобится пакет ts-node:
yarn add -D ts-node
После этого добавим необходимые команды в package.json:
"typeorm": "ts-node -r tsconfig-paths/register ./node_modules/typeorm/cli.js",
"migration:generate": "yarn run typeorm migration:generate -n",
"migration:create": "yarn run typeorm migration:create -n",
"migration:run": "yarn run typeorm migration:run"
Первая команда, typeorm, добавляет обертку в виде ts-node для запуска cli TypeORM. Остальные команды — это удобные сокращения, которыми вы как разработчик будете пользоваться практически каждый день:
migration:generate — создание миграции на основе изменений в ваших моделях.
migration:create — создание пустой миграции.
migration:run — запуск миграций.
Ну теперь точно все, мы добавили необходимые пакеты, сконфигурировали приложение для работы с базой как с cli, так и с самого приложения а также запустили СУБД. Пришло время добавить логику в наше приложение.
Установка пакетов для создания CRUD
Используя только Nest можно создать API, позволяющий создавать, читать, обновлять и удалять сущность. Такое решение будет максимально гибким однако для некоторых случаев избыточным. К примеру, если вам нужно быстро создать прототип, то зачастую можно пожертвовать гибкостью ради скорости разработки. Многие фреймворки предоставляют функционал генерации CRUD по описанию модели данных определенной сущности. И Nest не исключение! Данную функциональность предоставляет пакет @nestjsx/crud. Возможности его весьма интересны:
- легкая установка и настройка;
- независимость от СУБД;
- мощный язык запросов с возможностью фильтрации, пагинации, сортировки, загрузки связей и вложенных сущностей, кеширование и т.д.;
- пакет для формирования запросов на front-end;
- легкое переопределение методов контроллера;
- небольшой конфиг;
- поддержка swagger документации.
Функциональность разбита на несколько пакетов:
- @nestjsx/crud — базовый пакет, который предоставляет декоратор Crud() для генерации роутов, конфигурирования и валидации;
- @nestjsx/crud-request — пакет, предоставляющий билдер/парсер запросов для использования на стороне frontend;
- @nestjsx/crud-typeorm — пакет для интеграции с TypeORM, предоставляющий базовый сервис TypeOrmCrudService с CRUD методами работы с сущностями в БД.
В данном руководстве нам понадобятся пакеты nestjsx/crud и nestjsx/crud-typeorm. Для начала, поставим их
yarn add @nestjsx/crud class-transformer class-validatorПакеты class-transformer и class-validator в данном приложении требуются для декларативного описания правил трансформирования экземпляров моделей и валидации входящих запросов соответственно. Данные пакеты от одного автора, поэтому интерфейсы схожи.
Непосредственная реализация CRUD
В качестве примера модели мы возьмем список пользователей. У пользователей будут следующие поля: id, username, displayName, email. id — автоинкрементное поле, email и username — уникальные поля. Все просто! Осталось воплотить нашу задумку в виде Nest приложения.
Для начала необходимо создать модуль users, который будет отвечать за работу с пользователями. Воспользуемся cli от NestJS, и в корневой директории нашего проекта выполним команду nest g module users.
dmitrii@dmitrii-HP-ZBook-17-G3:~/projects/nest-rest git:(master*)$ nest g module users
CREATE /src/users/users.module.ts (82 bytes)
UPDATE /src/app.module.ts (312 bytes)
В данном модуле добавим папку entities, где у нас будут лежать модели данного модуля. В частности, добавим сюда файл user.entity.ts с описанием модели пользователей:
import { Column, Entity, PrimaryGeneratedColumn } from 'typeorm';

@Entity()
export class User {
  @PrimaryGeneratedColumn()
  id: string;

  @Column({unique: true})
  email: string;

  @Column({unique: true})
  username: string;

  @Column({nullable: true})
  displayName: string;
}
Чтобы данную модель "увидело" наше приложение, необходимо в модуль UsersModule импортировать TypeOrmModule следующего содержания:
import { Module } from '@nestjs/common';
import { UsersController } from './controllers/users/users.controller';
import { UsersService } from './services/users/users.service';
import { TypeOrmModule } from '@nestjs/typeorm';
import { User } from './entities/user.entity';

@Module({
  controllers: [UsersController],
  providers: [UsersService],
  imports: [
    TypeOrmModule.forFeature([User])
  ]
})
export class UsersModule {}
Т.е здесь мы импортируем TypeOrmModule, где в качестве параметра метода forFeature указываем список моделей, относящихся к данному модулю.
Остается создать соответствующую сущность в базе данных. Для этих целей служит механизм миграций. Чтобы создать миграцию на основе изменений в моделях, необходимо выполнить команду npm run migration:generate -- CreateUserTable:
$ npm run migration:generate -- CreateUserTable
Migration /home/dmitrii/projects/nest-rest/migrations/1563346135367-CreateUserTable.ts has been generated successfully.
Done in 1.96s.
Нам не пришлось писать миграцию вручную, все произошло магическим образом. Это ли не чудо! Однако и это еще не все. Взглянем на созданный файл с миграцией:
import {MigrationInterface, QueryRunner} from "typeorm";

export class CreateUserTable1563346816726 implements MigrationInterface {

    public async up(queryRunner: QueryRunner): Promise<any> {
        await queryRunner.query(`CREATE TABLE "user" ("id" SERIAL NOT NULL, "email" character varying NOT NULL, "username" character varying NOT NULL, "displayName" character varying, CONSTRAINT "UQ_e12875dfb3b1d92d7d7c5377e22" UNIQUE ("email"), CONSTRAINT "UQ_78a916df40e02a9deb1c4b75edb" UNIQUE ("username"), CONSTRAINT "PK_cace4a159ff9f2512dd42373760" PRIMARY KEY ("id"))`);
    }

    public async down(queryRunner: QueryRunner): Promise<any> {
        await queryRunner.query(`DROP TABLE "user"`);
    }

}
Как можно заметить, был автоматически сгенерирован не только метод для запуска миграции, но и метод для ее отката. Фантастика!
Остается только накатить данную миграцию. Делается это следующей командой:
npm run migration:run.Все, теперь изменения схемы перекочевали в базу данных.
Далее создадим сервис, который будет отвечать за работу с пользователями и отнаследуем его от TypeOrmCrudService. В параметр родительского конструктора необходимо передать репозиторий интересующей сущности, в нашем случае User репозиторий.
import { Injectable } from '@nestjs/common';
import { TypeOrmCrudService } from '@nestjsx/crud-typeorm';
import { User } from '../../entities/user.entity';
import { InjectRepository } from '@nestjs/typeorm';
import { Repository } from 'typeorm';

@Injectable()
export class UsersService extends TypeOrmCrudService<User>{
  constructor(@InjectRepository(User) usersRepository: Repository<User>){
    super(usersRepository);
  }
}
Данный сервис нам понадобится в контроллере users. Для создания контроллера наберите в консоли nest g controller users/controllers/users
dmitrii@dmitrii-HP-ZBook-17-G3:~/projects/nest-rest git:(master*)$ nest g controller users/controllers/users
CREATE /src/users/controllers/users/users.controller.spec.ts (486 bytes)
CREATE /src/users/controllers/users/users.controller.ts (99 bytes)
UPDATE /src/users/users.module.ts (188 bytes)
Откроем данный контроллер и отредактируем, чтобы добавить немного магии nestjsx/crud. На класс UsersController добавим декоратор следующего вида:
@Crud({
  model: {
    type: User
  }
})
Crud — это декоратор, добавляющий в контроллер необходимые методы для работы с моделью. Тип модели указывается в поле model.type конфигурации декоратора.
Второй шаг — необходимо реализовать интерфейс CrudController<User>. "В сборе" код контроллера выглядит следующим образом:
import { Controller } from '@nestjs/common';
import { Crud, CrudController } from '@nestjsx/crud';
import { User } from '../../entities/user.entity';
import { UsersService } from '../../services/users/users.service';

@Crud({
  model: {
    type: User
  }
})
@Controller('users')
export class UsersController implements CrudController<User>{
  constructor(public service: UsersService){}
}
И это все! Теперь контроллер поддерживает весь набор операций с моделью! Не верите? Давайте попробуем наше приложение в деле!
Создание сценария запросов в TestMace
Для тестирования нашего сервиса мы будем использовать IDE для работы с API TestMace. Почему TestMace? По сравнению с аналогичными продуктами, он имеет следующие преимущества:
- мощная работа с переменными. На данный момент существует несколько видов переменных, каждый из которых выполняет определенную роль: встроенные переменные, динамические переменные, переменные окружения. Каждая переменная принадлежит какому-либо узлу с поддержкой механизма наследования;
- легкое создание сценариев без программирования. Об этом речь пойдет ниже;
- человекочитаемый формат, позволяющий сохранять проект в системах контроля версий;
- автодополнение, подсветка синтаксиса, подсветка значений переменных;
- поддержка описания API с возможностью импорта из Swagger.
Давайте запустим наш сервер командой npm start и попробуем обратиться к списку пользователей. Список пользователей, судя по нашей конфигурации контроллера, можно получить по url localhost:3000/users. Сделаем запрос на данный url.
После запуска TestMace вы можете увидеть такой интерфейс:
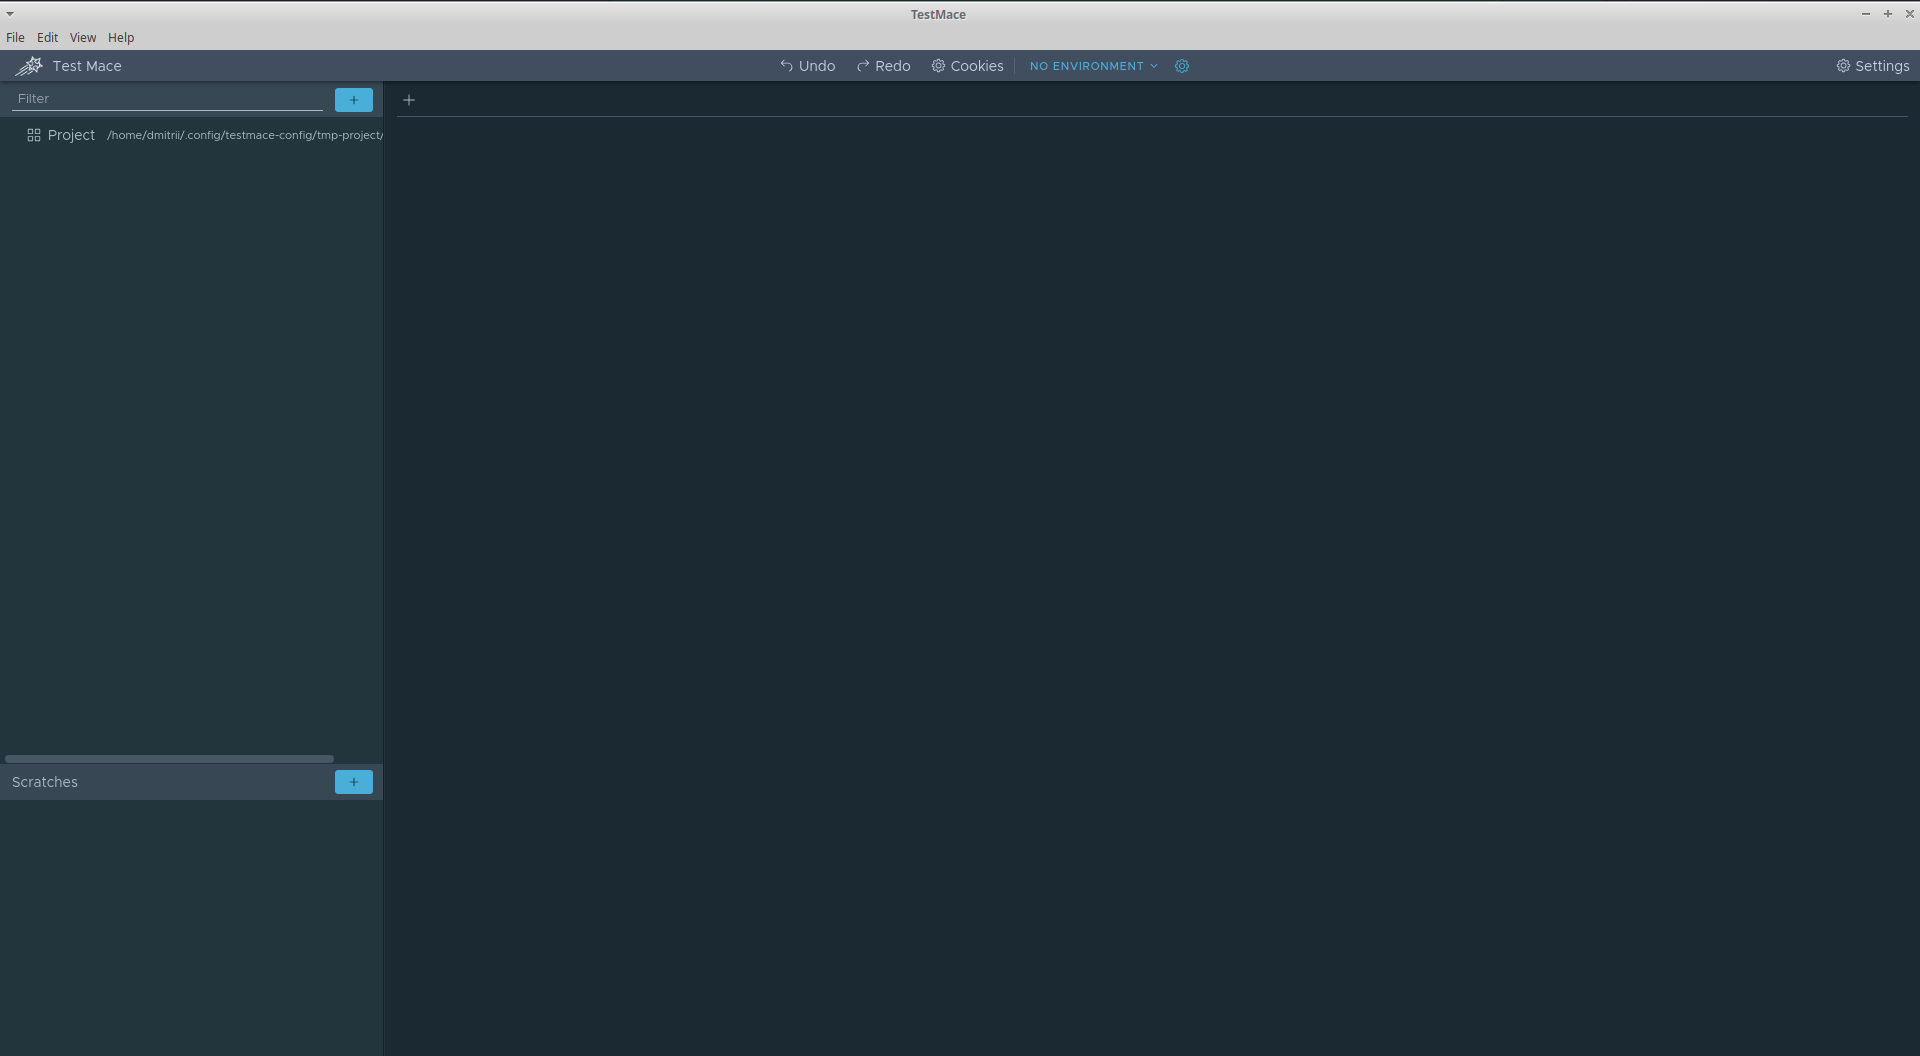
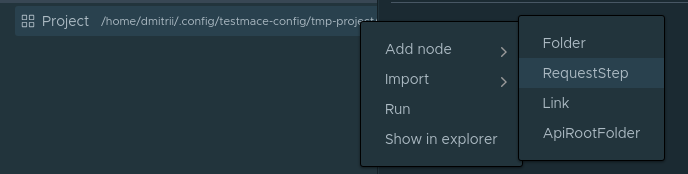
Слева сверху находится дерево проектов с корневым узлом Project. Давайте попробуем создать первый запрос на получение списка пользователей. Для этого создадим RequestStep узел. Делается это в контекстном меню Project узла Add node -> RequestStep.
В поле URL вставьте localhost:3000/users и выполните запрос. Получим 200 код с пустым массивом в теле ответа. Оно и понятно, мы еще никого не добавляли.
Давайте создадим сценарий который будет включать в себя следующие шаги:
- cоздание пользователя;
- запрос по id только что созданного пользователя;
- удаление по id пользователя, созданного на шаге 1.
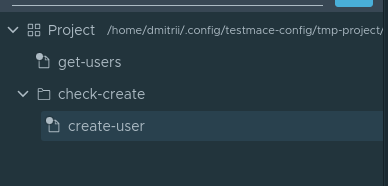
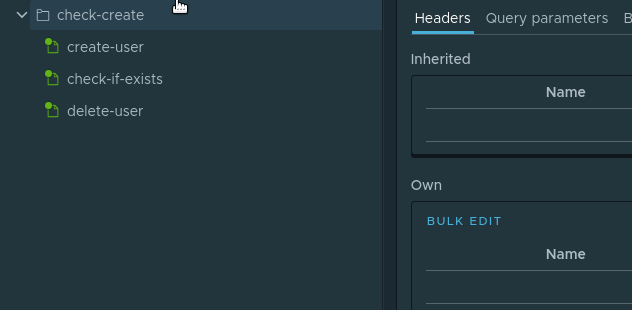
Итак, поехали. Для удобства создадим узел типа Folder. По сути это просто папка, в которой сохраним весь сценарий. Для создания Folder узла необходимо в контекстном меню Project узла выбрать Add node -> Folder. Назовем узел check-create. Внутри узла check-create создадим наш первый запрос на создание пользователя. Назовем вновь созданный узел create-user. То есть на данный момент иерархия узлов будет выглядеть следующим образом:
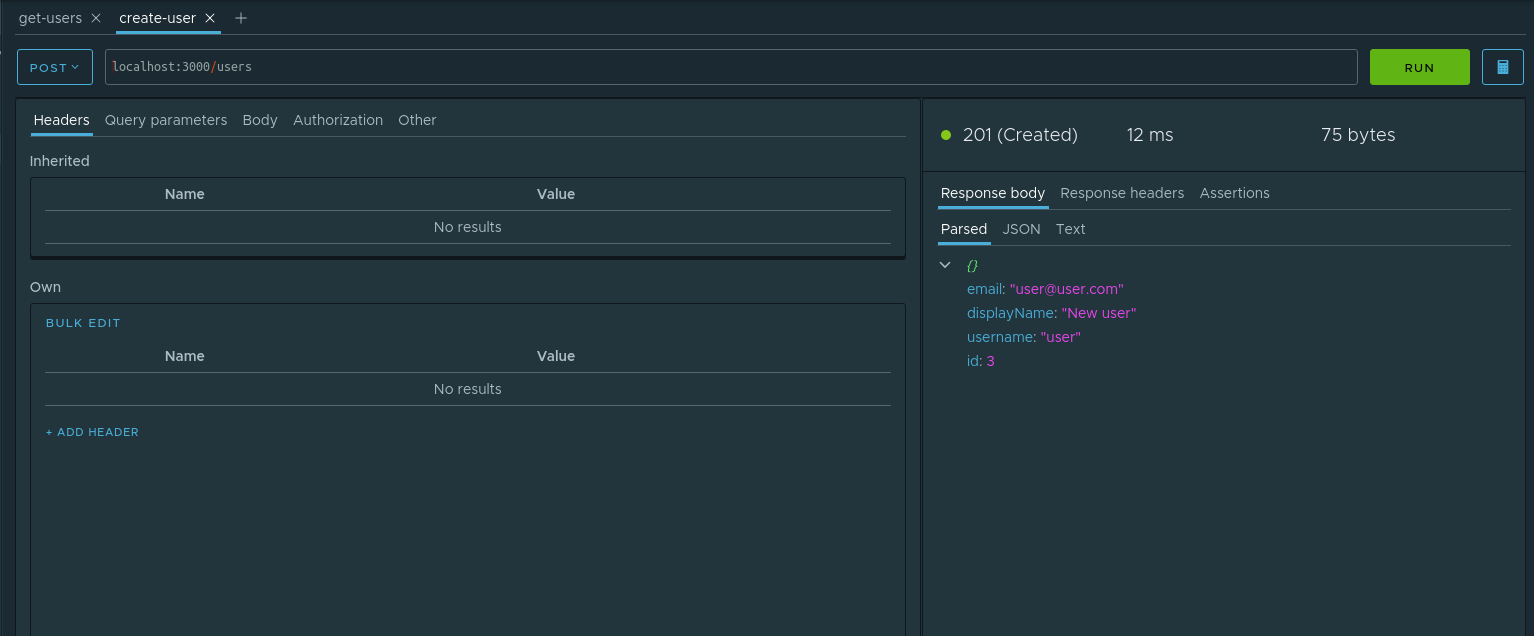
Давайте перейдем к вкладке открытого create-user узла. Введем следующие параметры для запроса:
- Тип запроса — POST
- URL — localhost:3000/users
- Body — JSON со значением
{"email": "user@user.com", "displayName": "New user", "username": "user"}
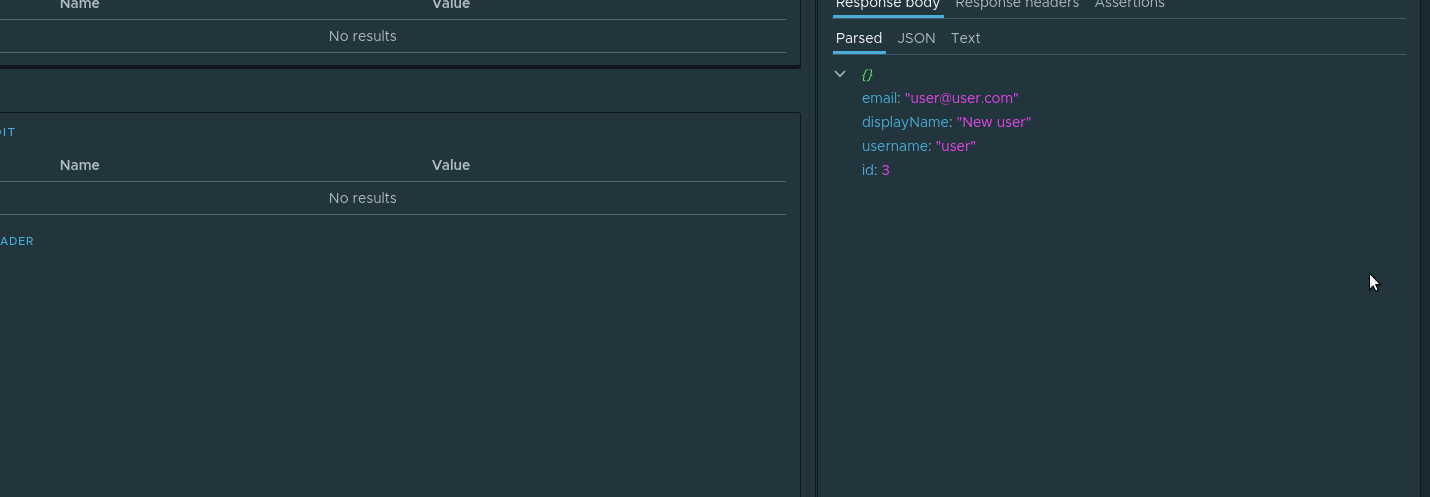
Выполним данный запрос. Наше приложение говорит, что запись создана.
Что ж, давайте проверим данный факт. Чтобы в последующих шагах оперировать с id созданного пользователя, данный параметр необходимо сохранить. Для этого отлично подходит механизм динамических переменных. Давайте на нашем примере рассмотрим, как происходит работа с ними. Во вкладке parsed ответа у узла id в контекстном меню необходимо выбрать пункт Assign to variable. В диалоговом окне необходимо задать следующие параметры:
- Node — в каком из предков создавать динамическую переменную. Выберем check-create
- Variable name — название этой переменной. Назовем
userId.
Вот как выглядит процесс создания динамической переменной:
Теперь при каждом выполнении данного запроса значение динамической переменной будет обновляться. А т.к. динамические переменные поддерживают механизм иерархического наследования, переменная userId будет доступна в потомках check-create узла любого уровня вложенности.
В следующем запросе данная переменная нам пригодится. А именно, мы запросим вновь созданного пользователя. В качестве потомка узла check-create мы создадим запрос check-if exists с параметром url равным localhost:3000/users/${$dynamicVar.userId}. Конструкция вида ${variable_name} это получение значения переменной. Т.к. у нас динамическая переменная, то чтобы получить ее необходимо обратиться к объекту $dynamicVar, т.е полностью обращение к динамической переменной userId будет выглядеть следующим образом ${$dynamicVar.userId}. Выполним запрос и убедимся, что данные запрашиваются корректно.
Остался последний штрих — сделать запрос на удаление. Он нам нужен не только для того, чтобы проверить работу удаления, но и, так сказать, подчистить за собой в базе, т.к. поля email и username уникальны. Итак, в узле check-create создадим запрос delete-user со следующими параметрами
- Тип запроса — DELETE
- URL —
localhost:3000/users/${$dynamicVar.userId}
Запускаем. Ждем. Наслаждаемся результатом)
Ну и теперь мы можем в любой момент запустить полностью данный сценарий. Чтобы запустить сценарий необходимо выбрать в контекстном меню check-create узла пункт Run.
Узлы в сценарии выполнятся друг за другом
Данный сценарий вы можете сохранить к себе в проект, выполнив File -> Save project.
Заключение
В формат данной статьи просто не смогли уместиться все фишки использованных инструментов. Что касается основного виновника — пакета nestjsx/crud — неосвещенными остались следующие темы:
- кастомная валидация и трансформация моделей;
- мощный язык запросов и удобное его использование на фронте;
- переопределение и добавление новых методов в crud-контроллеры;
- поддержка swagger;
- управление кэшированием.
Однако даже описанного в статье достаточно, чтобы понять, что даже такой энтерпрайсный фреймворк как NestJS имеет в загашнике инструменты для быстрого прототипирования приложений. А такая классная IDE как TestMace позволяет поддержать заданный темп.
Исходный код данной статьи, вместе с проектом TestMace, доступен в репозитории https://github.com/TestMace/nest-rest. Для открытия проекта TestMace достаточно в приложении выполнить File -> Open project.
