
Introduction & Recap
In the previous blog post, we learned how to filter, sort and group our table. This is a fundamental aspect of every CRUD application because most of the time users have to deal with hundreds of hundreds of records.
What will be covered on this exercise
With Part 3 of this series of blog posts, we will learn how to create a Master-Detail application leveraging the SplitApp UI control and how correctly configure the app’s manifest to handle routes and targets.
- SplitApp: UI control that allows you to create a Master-Detail application (used as a replacement of the App control)
- Routing: we will configure the manifest.json to correctly handle the routing of the application
- ObjectHeader: control that enables the user to easily identify a specific object. The object header title is the key identifier of the object and additional text and icons can be used to further distinguish it from other objects
- Navigation to a detail view and bind the element context: you will learn how to navigate and open a detail page and bind the current View (of the detail) to a new context
- List: in the master page we will use a list to display BusinessPartner because we will have less space
Let’s code
- Create an App.view.xml where we will put our SplitApp control and nothing else
- Configure the manifest.json file to use the new App view and create two routes (with targets) that will be used for both master and detail navigation
- Create a BusinessPartnerList.xml.view and move here all the content of the content of the Home.view.xml
- Remove the FilterBar and transform a Table in a List. Don’t panic, everything you’ve learned so far will be used inside the detail page
- Add navigation to the detail page when the user clicks a BusinessPartner item
- Create a BusinessPartnerDetail.view.xml page to display the Partner information (that could not be added to the list item) into an ObjectHeader and SaleOrders (into a table) associated with the selected partner
SplitApp
SplitApp is a perfect control used when you need to create a Master-Detail application.
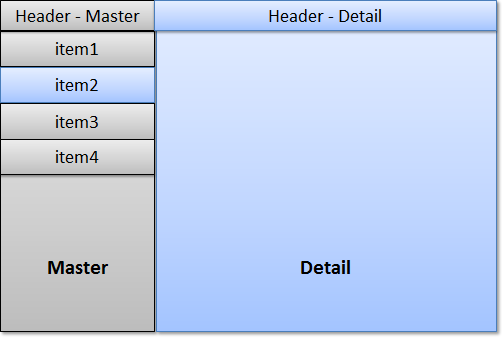
The SplitApp will adapt its behavior based on the user devices. On Desktop and Tablet, it will display both pages instead it will only display one page per time if the user is using a smartphone.
manifest.json
Now what you need to do is to update the configuration file:
- rootView: we need to update the viewName to use the new App.view.xml just created
- routing/config: we need to update the controlId value with the current SplitApp id
- routing: we need to add routes for the Master and Detail page. For each route, we also need to create a Target view.
Here’s an example of what you should have as a final result

To understand each configuration field of route and target element you should follow the Navigation and Routing section of the walkthrough.
BusinessPartnerList
This will be our Master page with the BusinessPartner records rendered in a List. Above the list, you should always put a SearchField in order to filter a list with values displayed into the StandardListItem.
When the user clicks on one of the items the navigation will be triggered and the Router (part of the framework) will automatically load the route targets that you defined in the manifest. For each target, you have specified a related View that will be also loaded by the framework.
This is how you should handle it:
onItemPress: function(oEvent) {
    var oItem = oEvent.getParameter("listItem");

    var sBusinessPartnerID = oItem.getBindingContext().getProperty("BusinessPartnerID");
    this.getOwnerComponent().getRouter().navTo("TargetBusinessPartnerDetail",
        {
            BusinessPartnerID: sBusinessPartnerID
        },
        !Device.system.phone
    );
}
Get the BusinessPartnerID from the item binding context (that ID is the primary key of the BusinessPartnerSet so it’s something important that will be used to access the Partner detail).
Navigate via the navTo method of the framework Router to our detail page passing the BusinessPartnerID as a parameter (you have defined this route in your manifest.json, do you remember?)
BusinessPartnerDetail
We’re on the detail page of our Business Partner. An important thing to do when the framework loads the View and the relative Controller is to attach our logic when the correct route is loaded. To do that we need to implement some code in the onInit code of our BusinessPartnerDetail controller like that:
onInit: function () {
    var oRouter = sap.ui.core.UIComponent.getRouterFor(this);
    oRouter.getRoute("TargetBusinessPartnerDetail").attachMatched(this.__onRouteMatched, this);
},

__onRouteMatched: function(oEvent) {
    var that = this;
    this.getView().bindElement({
        path: "/BusinessPartnerSet('" + oEvent.getParameter("arguments").BusinessPartnerID + "')",
        events : {
            dataRequested: function () {
                that.getView().setBusy(true);
        },
            dataReceived: function () {
                that.getView().setBusy(false);
            }
        }
    });
}
It’s important to do so otherwise we won’t have access to the correct BusinessPartnerID needed to load the Partner detail via the bindElement.
The bindElement allows our view to “move” our binding to the new Path “ /BusinessPartnerSet(‘12345678’)” that contains relative values for the Partner detail.
In the Detail page, we would like to show the Partner detail information (that we could not show inside the list) in an ObjectHeader.
Below the ObjectHeader we will display a Table to show all the SaleOrder (look at the NavigationProperty ToSalesOrder inside the XML manifest) attached to a BusinessPartner.
For each SaleOrder we will display:
- OrderID with Note (ObjectIdentifier)
- LifecycleStatusDescription (ObjectStatus, the color will be handled by a Formatter)
- BillingStatusDescription (ObjectStatus, the color will be handled by a Formatter)
- DeliveryStatusDescription (ObjectStatus, the color will be handled by a Formatter)
- GrossAmount (ObjectNumber to handle the country currency correctly)
- NetAmount (ObjectNumber to handle the country currency correctly)
- TaxAmount (ObjectNumber to handle the country currency correctly)
- CreatedAt (well formatted)
Side note about UI control used in the table:
- ObjectIdentifier is a display control that enables the user to easily identify a specific object. The ObjectIdentifier title is the key identifier of the object and additional text and icons can be used to further distinguish it from other objects.
- ObjectStatus allows you to color the text based on a status value that could be Error, Warning, Success or None.
- ObjectNumber control displays number and number unit properties for an object. The number can be displayed using semantic colors to provide additional meaning about the object to the user. It’s very useful to combine price and currency or number and UoM
Conclusion and what’s next in Part 4?
If you want to check out the final result you can directly go to the step_3 branch of our GitHub Project.
In the next part, we will add a second drill-down navigation to the SaleOrderItem of our SaleOrder and add a DELETE operation!
