Comments 10
Ничего супер нового в этой плате не увидел! За такую стоимость гораздо лучше купить: малинку + arduino с комплектом датчиков, стоить это все дешевле в разы. Сомнительно что плата будет пользоваться популярностью.
Тут суть не в мощности а в ардуино-подобной среде разработки с легким стартом. По сравнению с той же базовой ардуино на Atmega здесь на борту просто космический корабль на котором можно построить множество различных интересных устройств для обучения и не только. В первую очередь это низкоуровневый железячный девайс. Не пойму почему такие устройства пытаются сравнить с малинками на которые ставится линукс и которая служит для решения совсем других задач.
Дизайн платы так и предполагает, что она должна вставляться контактами в разъём, как картриджи у игровых приставок, но как понял, эти полоски чисто для красоты, а выводы только на колечках и ниже?
Нет, не для красоты.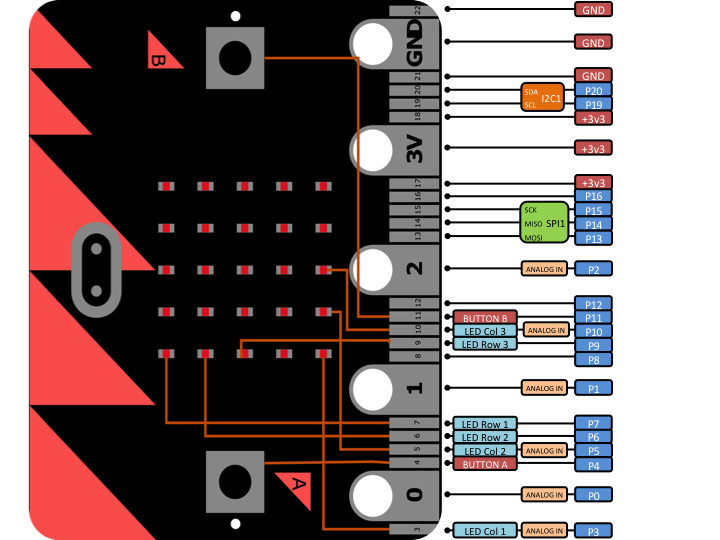


Судя по официальной спеке все они используются:
3. P0 (left large pin (crocodile clip port) with edge connector at the bottom) — labelled 0 on the board
4. P1 (middle large pin (crocodile clip port) with edge connector at the bottom) — labelled 1 on the board
5. P2 (right large pin (crocodile clip port) with edge connector at the bottom) — labelled 2 on the board
6. +3V — labelled 3V on the board. This is 3V PWR OUT
7. GND
8. P3 – P22 pins from left to right with edge connector at the bottom. Referred to as Pins when referencing that part of the board. Text will talk about 'pins' when referring to individual connections or the general way of connecting to the board – not labelled on the front of the board
Без HDMI это всего лишь Arduino.
Touch Develop — разработка не самого Microsoft, а его подразделения Microsoft Research.
называть микрокомпьютером плату с микроконтроллером — это гениально.
Sign up to leave a comment.
Микрокомпьютер micro:bit от BBC уже можно купить